I've moved! Follow me over to The Balanced Baker.


Showing posts with label Clean Eating. Show all posts

Friday, February 3, 2012

Guacamole

IMG_0181c

Along with pico de gallo and fresh tomatillo salsa (which I hope to share someday!), this is another favorite recipe to come from my husband's family. It's so easy to throw together, and with avocados on sale for $1 each the past few weeks, we've been enjoying it every weekend. There are several schools of thought when it comes to what belongs in guacamole, but I definitely love the simplistic approach of this recipe from my husband's aunt, Ethel.

Creamy avocados in harmony with lime and cilantro make this a perfect snack for your next party, or any day!

Guacamole


Guacamole

Source: Tia Ethel
Yield: About 2 cups
Preparation time: 10 minutes


Ingredients

  • 4 avocados
  • 2 limes
  • 3/4 cup fresh cilantro
  • 1/4 teaspoon garlic powder (optional)
  • pinch salt, to taste

Instructions

  1. Add the flesh from the avocados to a large bowl or food processor. Set aside one or two of the pits; we'll add them back at the end to keep the guacamole from browning.
  2. Add juice of 2 limes, cilantro, garlic powder (if using), and a pinch of salt to the bowl.
  3. Blend with an immersion blender or process in the food processor, until well blended and no large pieces of avocado are visible.
  4. Check for taste; add more salt and blend again if needed. I like to taste the guacamole using the chips that it will be served with, since those are often salty on their own.
  5. Add reserved avocado pits and push them into the guacamole.  Serve immediately, or cover tightly with plastic wrap pressed against the guacamole and chill in the refrigerator until serving. (I prefer it slightly chilled, so I like to do this.)


    Thursday, August 25, 2011

    Chipotle Salsa Turkey Burgers

    Whew! It's time to dust off the cobwebs around here. We've had a busy summer and I took some time to focus on my family, friends, and home. I'm excited to get back to blogging again, especially with fall just around the corner and a new season of Glee and Glee Cupcakes!

    Part of the reason for the slow down around here is that I wasn't really making new recipes. To keep things simple in the kitchen, I fell back on things I've made before and knew we loved. This recipe is one that I made many times over this summer. The inspiration came one day when there were a few odd ingredients in the fridge that needed to be used up. This is one of those recipes that, now, I can skip the recipe card and go based on memory - and I love that!

    CRW_0085c


    These turkey burgers are a great choice when you are looking for something different than your run-of-the-mill burgers. The chipotle and adobo sauce provide a great smokiness, and the red onion is bright punch of flavor. We love them!


    Chipotle Salsa Turkey Burgers


    Chipotle Salsa Turkey Burgers

    Yield: Serves 4
    Preparation time: 10 minutes
    Cook time: 15 minutes
    Total time: 25 minutes


    Ingredients

    • 1 pound ground turkey
    • 1 chipotle pepper with about 1 tablespoon adobo sauce
    • 1/3 cup salsa
    • 1/2 cup whole wheat breadcrumbs
    • 1/3 cup red onion, diced
    • 1/3 cup chopped fresh cilantro
    • juice from one large lime, divided
    • 2 teaspoons chili or taco seasoning
    • 1/2 an avocado
    • burger buns, lettuce, sliced tomato, cheese, and whatever else you like to put on burgers

    Instructions

    1. De-seed and mince the chipotle pepper.
    2. Add all ingredients except avocado and half of the lime juice to a large bowl.
    3. Mix gently just until thoroughly combined; do not over-work.
    4. Shape into four equal burgers. Grill over medium-high heat for 5-7 minutes per side, or until no longer pink in the center.
    5. Mix avocado and reserved half of the lime juice in a small bowl. Spread avocado mixture on burger bun. Build the burger with your favorite toppings, and enjoy!

      Friday, June 24, 2011

      Good Morning Muffins

      Long ago, I learned an important kitchen lesson: read the recipe in its entirety before you even think about making it. Too many times before that, I'd only have skimmed the ingredient list, then go to make the recipe and realize I need an overnight rest/marinade, or the final product needs 4 hours to set afterwards, or some other hidden time requirement. I'm much better, now, at properly preparing myself for a recipe. Still, I sometimes get ahead of myself.

      Last Saturday I was happily pouring over a new baking book, when I saw this muffin recipe. I thought to myself, "perfect! I'll prep the ingredients tonight and bake in the morning." I often do that, these days, since dragging out containers of dry ingredients and measuring them is a lot easier when our son is asleep, than when he is awake. Later that evening, when I set out to combine dry ingredients and locate all the others and arrange them in an easy-to-grab place in the fridge, I realize there was very little prep work that could be done. Sure, I could throw together the few dry ingredients, but those comprised not even a third of the ingredient list - not a huge time saver. I didn't want to grate the zucchini or chop the apple ahead of time, so I conceded and left all the prep work for Sunday morning.
      IMG_0547c

      As I made the muffins on Sunday morning, I wondered if all this work (in itself not much, but more than any other muffin recipe I've made) would be worth it. I got my answer shortly after removing these glorious muffins from the oven. Absolutely - yes! I was so excited to try one, I didn't even wait for them to properly cool. These quickly became my new favorite muffin, and I can't wait to make them again. The add-ins play so well together, against the almost nutty whole wheat muffin base, with just the right hint of cinnamon to round it out.

      IMG_0550c


      These lightly sweetened muffins are packed with delicious add-ins and make a fabulous breakfast!

      Good Morning Muffins


      Good Morning Muffins
      Source: Slightly adapted from Flour, by Joanne Chang
      Yield: 12 muffins
      Preparation time: 20 min
      Cook time: 45 min
      Total time: 1 hour, 5 minutes


      Ingredients

      • 1/2 cup (40 grams) wheat or oat bran
      • 1/2 cup (120 grams) hot water
      • 1 small zucchini, grated (about 1 1/2 cups packed or 200 grams)
      • 1/2 cup (80 grams) raisins
      • 1/2 cup (50 grams) pecan halves, chopped and toasted
      • 1/2 cup (60 grams) unsweetened flaked coconut
      • 1 apple, peeled, cored and chopped (about 1 cup or 120 grams)
      • 2/3 cup (150 grams) packed light brown sugar
      • 3 eggs (or 3 Tablespoons ground flax seed with 9 tablespoons water)
      • 3/4 cup (150 grams) canola or safflower oil
      • 1 teaspoon vanilla extract
      • 1 1/2 cups (210 grams) whole wheat pastry flour
      • 3/4 cup (75 grams) old fashioned rolled oats (not instant)
      • 2 teaspoons baking powder
      • 1/2 teaspoon kosher salt
      • 1/2 teaspoon ground cinnamon

        Instructions

        1. Position a rack in the center of the oven and preheat to 350 degrees F. Prepare a muffin tin with nonstick baking spray or paper liners.
        2. In a medium bowl, stir together the bran and hot water until the bran in completely moistened. Add zucchini, raisins, pecans, coconut, apple; stir until well mixed.
        3. If you are using eggs: Using a stand mixer with a whisk attachment, beat sugar and eggs on medium speed for 3-4 minutes, until the mixture thickens and lightens. (This will take 6-8 minutes with a hand-held mixer). On low speed, drizzle in oil, slowly, and vanilla. Adding it slowly is key to maintain the air you have beaten into the eggs. If you are using flax seed/water as an egg substitute: add sugar, flax seed, water, oil and vanilla to a large bowl and whisk until thoroughly combined.
        4. In a medium bowl, stir together oats, flour, baking powder, salt, and cinnamon. Add the flour mixture to the egg mixture, folding carefully with a spatula until well combined. Add the bran mixture and fold until well combined. Spoon batter into prepared muffin cups, dividing it evenly and filling the cups to the rim.
        5. Bake 35 to 45 minutes, or until muffins are lightly brown on top and spring back when pressed in the middle with a fingertip. Let cool on a wire rack for 20 minutes, then remove muffins from pan to finish cooling.
        6. The muffins taste best the day they are made, but can be stored in an airtight container at room tempurature for up to 3 days. They can be frozen up to a week, if wrapped tightly in plastic wrap.

          Friday, April 22, 2011

          Turkey and Chickpea Burgers

          I can't believe it's been almost two years since I started eating clean. (For anyone that's new, take a look back at my introduction to clean eating post.) I haven't been perfect - pregnancy did have an effect on my diet, and I did the best that I could during the few months when not much seemed appetizing. Obviously pregnancy throws a kink in one's weigh loss plans, but I am happy to say that renewing my commitment to eating clean after the birth of our son helped me reach my pre-pregnancy weight. I feel great and am happy to be back on track towards reaching my ideal weight.  Sure, I still bake some decadent desserts and a few non-clean meals and side dishes, but overall, adapting recipes to be a almost, if not totally, clean is second nature. I don't miss much about full fat and over processed foods. I rarely enter the aisles at the grocery store; most of my time is spend in the produce section! I have come to a place where clean eating is easy. It's our lifestyle now, and I am so happy to have over 100 clean recipes on this blog to share with you! 

          IMG_0012c

          One of my favorite recipes sources is still, two years later, Clean Eating Magazine. I'm not with it enough to know when the next issue is supposed to arrive in the mail, so when it does, it's like Christmas. I have to flip through right away, and check out the newest ideas.  Spring has finally made its way to New England, and that means only one thing to my husband: it's grilling time!  I went back through some old issues for any recipes that were overlooked, and rediscovered this recipe for turkey and chickpea burgers.

          Turkey burgers are my favorite, and this is a great twist on them. These are quick to throw together and taste great!

          Turkey and Chickpea Burgers


          Turkey and Chickpea Burgers
          Source: Slightly adapted from Clean Eating Magazine, Jan/Feb 2009
          Yield: Serves 5
          Preparation time: 10 min
          Total time: 25 minutes


          Ingredients

          • 1 can chickpeas (15 oz)
          • 1/2 cup scallions, roughly chopped
          • 1 teaspoon cumin (we use coriander)
          • 1 teaspoon fresh black ground pepper
          • 1/4 teaspoon sea salt
          • 2 tablespoons worcestershire sauce
          • 1 pound ground turkey breast
          • red onion, tomato, lettuce, and buns, for serving

          Instructions

          1. In a food processor, combine chickpeas, scallions, cumin, pepper, salt and worchestershire sauce. Pulse until smooth.
          2. Transfer chickpea mixture to a large bowl. Add ground turkey and mix until well combined.
          3. Divide mixture into 5 equal portions and shape into a patty. Grill burgers over medium heat, about 5 minutes per side, until cooked through.
          4. Serve burgers on buns with your favorite burger toppings.

            Friday, April 15, 2011

            One Pot Meal: Baked Chicken

            One pot meals are a thing of wonder.  This especially rings true for a messy cook such as myself. Despite the fact that we have somewhere on the order of four times more counter space now than we did in our last home, I still manage to cover all the surfaces during some of my more involved cooking/baking days. I have been known to exclaim, "I don't have anywhere to put this!" only to have my husband look at me in bewilderment. In my defense, it usually involves needing my sink, which is, in my opinion, rather small for the size of our kitchen.
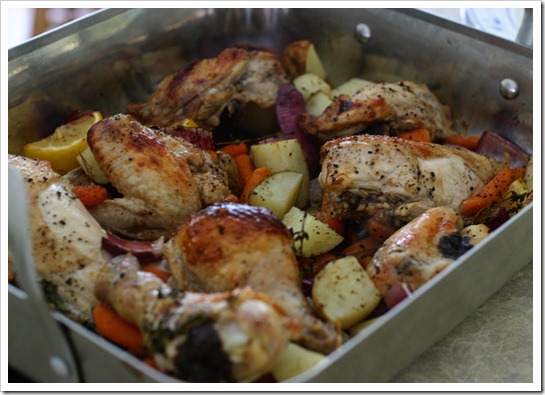
            IMG_0018c
            With my parents coming to visit last Sunday for a grandson-fix, I was inspired to make this by a lonely whole chicken wasting away in our deep freezer.  This recipe is easy all around (even more-so if you get your butcher to cut up the chicken for you) and great for when you have company.  Toss all the ingredients in a roasting pan and pop it in the oven for 50 minutes.  We even used the roasting pan as the serving dish and let everyone pick out what they wanted, buffet style.  With just one dish to clean up, it allowed for less time in the kitchen and more time where it counts - with family!

            Simple, but classic flavorings of balsamic vinegar, olive oil, and thyme make this baked chicken dish a great choice for last minute guests, or anytime you want a wholesome, comforting meal with minimal effort.

            Baked Chicken with Onions, Potatoes, Garlic, and Thyme


            Baked Chicken with Onions, Potatoes, Garlic, and Thyme
            Source: Slightly adapted from Everyday Food, October 2009
            Yield: Serves 4
            Preparation time: 10 minutes
            Cook time: 50 minutes
            Total time: 1 hour


            Ingredients

            • 1 whole chicken (3 to 3 1/2 pounds), cut into 8 pieces and breasts halved crosswise
            • 1 pound white new potatoes, halved (quartered if large)
            • 1 large red onion, cut into eighths
            • 1 head garlic, cloves separated and left unpeeled
            • 6 sprigs thyme
            • 1 lemon, quartered
            • 1 pound baby carrots
            • 1/4 cup extra-virgin olive oil
            • 2 tablespoons balsamic vinegar
            • Coarse salt and ground pepper

            Instructions

            1. Preheat oven to 450 degrees. Arrange chicken, potatoes, onion, carrots, garlic, thyme, and lemon in a 12-by-16-inch roasting pan.
            2. In a small bowl, whisk together the oil and vinegar and drizzle over chicken and vegetables.
            3. Toss to combine and season with salt and pepper. Turn chicken skin side up. Roast until chicken is browned and cooked through, about 50 minutes.

              Tuesday, April 12, 2011

              Peanut Butter Banana Chocolate Chip Pancakes

              IMG_0005c

              I recently talked about regional differences in traditional breakfast foods. With our first little one here now, we seem to be starting some breakfast traditions of our own. Once each weekend, we get up and cook a delicious breakfast together, be it biscuits and gravy, eggs with toast and hash browns, bagel sandwiches, or my favorite - pancakes! It's a nice change from a bowl of cereal or cream cheese laden bagel, and fun to prepare a meal together.

              IMG_0009c

              We typically use my favorite pancake recipe with apples and (sometimes) cranberries, but last week I got inspired to make peanut butter banana pancakes. I'm not sure where the urge came from, but my husband sometimes slathers peanut butter in between his pancakes, so I knew he would be on board! At the last minute, chocolate chips sounded like a perfect addition, so I tossed a few into the batter.

              I am so happy with how these pancakes turned out. There is a great balance of the three main components, which complement each other well in every bite!

              Peanut Butter Banana Chocolate Chip Pancakes


              Peanut Butter Banana Chocolate Chip Pancakes
              Source: Adapted from my favorite pancake recipe
              Yield: Serves 4 (2 pancakes each)
              Preparation time: 10 min
              Cook time: 15 min
              Total time: 25 minutes


              Ingredients

              • 1/2 cup whole wheat flour
              • 3/4 cup oat bran
              • 1 tablespoon baking powder
              • 1 teaspoon salt
              • 1/2 teaspoon ground cinnamon
              • 1 egg
              • 1 cup milk
              • 1 tablespoon oil
              • 1/2 cup natural peanut butter
              • 1 tablespoon honey
              • 1 banana
              • 1/3 cup bittersweet chocolate chips

              Instructions

              1. Add the peanut butter and honey to a heat-safe bowl. Microwave in 20 second intervals on low power until mixture is softened and warm. Mash half of the banana, and slice the remaning half into 1/4 inch thick rounds, then cut the rounds into quarters. Stir the mashed banana into the peanut butter mixture.
              2. Stir together oat bran through cinnamon in a large bowl. In a separate bowl, combine milk, egg, and oil; stir to mix.
              3. Add milk mixture to flour mixture, stir just until mixed. Fold in peanut butter mixture, chopped banana, and chocolate chips.
              4. Heat griddle or pan, then spray with cooking spray. Drop 1/3 cup of batter onto griddle, repeat with remaining batter. Heat until bubbles form at the surface and bottom is lightly browned, then flip and cook through.

              Friday, April 8, 2011

              Curry Shrimp with Green Beans and Soba Noodles

              A few weeks ago I mentioned one of our favorite curry recipes, and said it was one of two favorites. Today, I am bringing you the other favorite! After trying so many different recipes, this one always stood out as the best. When I went back to evaluate why, and compare all the recipes, I found that this one calls for twice the curry powder that the others do. That could definitely explain why we like this recipe so much more!

              CRW_0113c

              As luck would have it, I wanted to make this right as we ran out of curry powder. I was due to refill some other spices, so I turned to my trusty spice store, Penzeys, for a new order. I flipped to the curry page in the catalog and was instantly overwhelmed. There were so many different kinds, and I am somewhat embarrassed to admit that I didn't realize "curry powder" was really a blend of several different spices. I thought curry powder was just - curry powder, like turmeric is just turmeric. Boy, was I wrong!

              I grabbed my empty curry jar and scanned the ingredient list, then picked the one in the catalog that sounded the closest and crossed my fingers as I placed the order. I chose the sweet curry powder, and it turned out to be the perfect choice. It was just the right blend for us!

              This is a fabulously quick, easy, one pot meal - great for a weeknight. This combination of spices is our favorite curry sauce, which I suspect we will be able to use in many other curry dishes in the future!

              Curry Shrimp with Green Beans and Soba Noodles


              Curry Shrimp with Green Beans and Soba Noodles
              Source: Slightly adapted from The Gracious Pantry
              Yield: Serves 2-3
              Preparation time: 5 min
              Cook time: 15 min
              Total time: 20 minutes


              Ingredients

              • 1 pound frozen shrimp (peeled and deveined, tail off)
              • 1 can light coconut milk (14 oz)
              • 1 pound fresh green beans
              • 3 green onions, diced
              • 2 teaspoons garlic powder
              • 2 teaspoons onion powder
              • 1 teaspoon paprika
              • 4 teaspoons curry powder
              • juice of 1/2 a lemon
              • 2 tablespoons cornstarch
              • 6 ounces soba noodles

              Instructions

              1. Combine all ingredients except soba noodles in a large pot or pan, cover and bring to a boil.
              2. Once you have a nice rolling boil, remove the lid and continue to cook over medium to medium-high heat.
              3. Add soba noodles and cook an additional 3-4 minutes, until noodles are soft and shrimp are cooked through.

                Wednesday, April 6, 2011

                Tilapia with Lemon Pesto and Oven Roasted Tomatoes

                We've been in a fish rut for a months now. All I seem to make with our stash of frozen tilapia is fish tacos. While fish tacos are pretty darn awesome, I knew I would need to move on, eventually. For a while I could blame it on the nice weather (I'm talking last summer, here), but even in the dead of winter, I turned to that easy-to-prepare, delicious, healthy fish taco recipe.
                IMG_0246c
                I could further blame it on the fact that most of the tilapia recipes in my queue call for breadcrumbs, and I can't find whole wheat breadcrumbs in the store. Or, I did eventually find some, but a look at the ingredient label revealed that they contained high fructose corn syrup. (In breadcrumbs? Really?) They immediately went back on the shelf. Yes, I know I can make them at home, but I'm too lazy busy to figure out how to achieve the right texture.

                Enter one of my favorites blogs: Elly Says Opa! This recipe caught my eye because I had some pesto to use up, and allowed me to skirt around my bread crumb debacle.

                This turned out to be a quick, simple way to prepare a flavorful dish!

                Tilapia with Lemon Pesto and Oven Roasted Tomatoes


                Tilapia with Lemon Pesto and Oven Roasted Tomatoes
                Source: Elly Says Opa!
                Yield: Serves 2
                Preparation time: 10 minutes
                Cook time: 20 minutes
                Total time: 30 minutes


                Ingredients

                • 1/2 pint cherry or grape tomatoes
                • 5 cloves garlic, peeled and smashed
                • 2 teaspoons olive oil
                • 2 tablespoons pesto
                • 1 lemon
                • 2 tilapia filets
                • salt and pepper

                Instructions

                1. Preheat the oven to 425. Toss the tomatoes and the garlic with the olive oil and some salt and pepper. Roast for about 10 minutes.
                2. Meanwhile, juice the lemon and reserve both the juice and the juiced lemon. To the juice, add the pesto and stir to combine. Season the tilapia with salt and pepper and then spread the pesto mixture on top of the fish.
                3. Take the pan of roasted garlic and tomatoes out of the oven and nestle the cut lemon into the pan. Place the tilapia on top of the lemon and tomatoes and put back in the oven for about 10 minutes, or until the fish is flaky and no longer opaque. Spoon the tomatoes over the fish.

                  Thursday, March 17, 2011

                  Irish Soda Bread

                  Despite a significant amount of Irish in my blood, I'd never had Irish soda bread until last weekend. With Saint Patrick's Day upon us, I've seen requests for this recipe everywhere, and it piqued my interest. When I first saw the (very simple) ingredient list, I thought, "What is so special about this bread?"

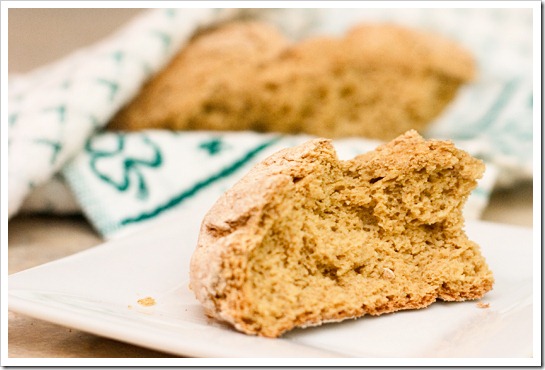
                  CRW_0108c

                  It seemed easy enough to whip up, so that I did. My first loaf was dense and almost chewy - not good eats. This recipe turned out so much better for my second attempt, and had me singing the praises of Irish soda bread along with everyone else.

                  This tasty bread is crisp on the outside, but so soft on the inside. The buttermilk lends great flavor to the bread - tear off a piece and enjoy with butter, jam, or just by itself! Happy Saint Patrick's Day!

                  Irish Soda Bread


                  Irish Soda Bread
                  Source: Slightly adapted from Cate's World Kitchen
                  Yield: 1 loaf
                  Preparation time: 10 minutes
                  Cook time: 45 minutes
                  Total time: 55 minutes

                  Ingredients

                  • 2 1/2 cups whole wheat pastry flour
                  • 1 teaspoon salt
                  • 1 1/8 teaspoons baking soda (fresh is best)
                  • 1 1/4 cups buttermilk

                  Instructions

                  1. Preheat the oven to 350 F, and grease a baking sheet (or line with parchment)
                  2. Combine the flour, salt and baking soda in a medium bowl and wisk together with a fork.
                  3. Stir in half the buttermilk, then add the remaining buttermilk 2 tbsp at a time.
                  4. You want the dough to be just a little bit moist. It should hold together, but not be sticky. If you accidentally add too much milk, knead in some flour until the dough is no longer sticky.
                  5. Shape into a ball, then cut an X into the top.
                  6. Bake for about 45 minutes, or until golden brown. (If you tap on the bottom of the loaf with your knuckles, it should sound hollow).
                  7. Let cool as long as you can stand to wait, then serve with butter and jam.
                    Best if eaten within about 3 hours of baking.


                    Tuesday, March 15, 2011

                    Basil Chicken in a Coconut-Curry Sauce

                    It's easy to get lost in the sea of recipe sources these days. There are cookbooks, family recipes tucked in a recipe box, magazines, Food Network shows, more magazines… and let's not forget all the other food blogs I have in my Google Reader. Every once in a while I think of those poor cookbooks (collecting dust), hanging around the kitchen, and find it refreshing to crack them open and rediscover the recipes waiting inside.


                    CRW_0097c


                    I recently pulled out my Better Homes and Gardens cookbook for some inspiration, and found plenty! I kept jumping from one page to the next, finding quite a few recipes to choose from given what ingredients I already had in the house. I was sold on this recipe, however, as soon as I saw the title. First off, it would use some basil that was dying a slow death in my refrigerator (and good basil is a terrible thing to waste). Second, I've been mildly obsessed with curry lately. In the last month, I've probably made five different curry dishes. Two have emerged as our favorites, for different reasons, and this is one of them.

                    We love this dish because marinating the chicken in the spices allows for a nice punch of flavor. The dish is balanced by the sauce, which uses fresh garlic, onion, and ginger, and has a surprisingly subtle background of basil.

                    Basil Chicken in a Coconut-Curry Sauce


                    Basil Chicken in a Coconut-Curry Sauce
                    Source: Reworded from Better Homes and Gardens Bridal Edition Cookbook
                    Yield: Serves 4
                    Preparation time: 25 minutes
                    Cook time: 20 minutes
                    Total time: 1 hour 45 minutes


                    Ingredients

                    • 2 teaspoons curry powder
                    • 1/2 teaspoon fresh cracked black pepper
                    • 1/2 teaspoon salt
                    • 1/4 teaspoon chili powder
                    • 4 boneless, skinless chicken breasts
                    • 1 tablespoon olive oil
                    • 1 cup chopped red onion
                    • 2 jalapenos, seeded and finely chopped
                    • 5 cloves garlic, minced or grated
                    • 1 can unsweetened light coconut milk (~14 ounces)
                    • 1 tablespoon cornstarch
                    • 3 tablespoons fresh basil, cut into ribbons
                    • 1 teaspoon freshly grated ginger
                    • 3 cups cooked rice (use brown rice if you are following a clean eating diet)

                    Instructions

                    1. In a medium bowl combine curry powder, black pepper, 1/4 teaspoon of the salt, and the chili powder. Cut chicken into 1-inch pieces. Add to spice mixture in bowl; toss to coat. Cover and chill for 1 to 2 hours to allow spices to penetrate meat.
                    2. Pour oil into a wok or large nonstick skillet; heat over medium-high heat. Add half of the chicken to wok. Cook and stir for 4 to 6 minutes or until chicken is no longer pink. Remove from wok. Repeat with remaining chicken.
                    3. Add onion, jalapeno peppers, and garlic to wok; cook and stir about 8 minutes or until crisp-tender.
                    4. Stir together coconut milk, cornstarch, and remaining 1/4 teaspoon salt until smooth. Carefully add to onion mixture in wok. Cook and stir until slightly thickened and bubbly.
                    5. Return chicken to wok. Stir in basil and ginger. Cook and stir about 2 minutes or until heated through. Serve over hot rice.

                    Wednesday, February 23, 2011

                    Peanut Butter Hot Chocolate with Whipped Coconut Cream

                    CRW_0060cf

                    Hot chocolate is one of the most comforting winter indulgences, I think. Warm, creamy, delicious chocolate - perfect for curling up with when it's cold and snowy outside. I look forward to enjoying hot chocolate all winter long, and it's one of the only ways I truly enjoy chocolate. My husband loves it, too, and when I saw this recipe for peanut butter hot chocolate, I knew he'd be excited about it.

                    CRW_0055c 

                    Chocolate and peanut butter is such a classic combination, and they marry well together in this lovely twist on classic hot chocolate. Growing up, my favorite topping was none other than the classic Fluff. I loved that stuff (well, I still do!) but it's not exactly fitting into the clean eating lifestyle. Enter: the genius happening over at The Gracious Pantry. Tiffany recently introduced her readers to a whipped cream alternative made from coconut milk. Given my recent addiction to all things curry, I had some coconut milk in stock and decided to try it out.

                    CRW_0057cs

                    All I can say is coconut cream = awesome. I forgot all about Fluff once I topped my hot chocolate with this heavenly stuff. I'm sure you are wondering if you can taste the coconut. I could when sampling it alone, but I skimped a bit on the honey/vanilla. Once atop the hot chocolate, I couldn't pick out the coconut at all. Just lovely, creamy deliciousness to perfectly complement more lovely, creamy deliciousness.

                    Peanut Butter Hot Chocolate with Whipped Coconut Cream
                    Source: Slightly adapted from Dolcetto Confections/Martha Stewart
                    Generously serves 2

                    2 cups skim milk
                    3 ounces bittersweet chocolate, chopped fine
                    3 tablespoons natural peanut butter
                    2 tablespoons sucanat
                    1 tablespoon whipped coconut cream

                    In a medium saucepan over low heat, warm milk until it just begins to simmer and bubbles form around the edge of the pan. Whisk in chocolates, peanut butter, and sucanat until melted and smooth. Cover and continue warming over low heat until warmed through. For a thicker cup of cocoa, simmer hot chocolate uncovered until desired thickness is achieved. Ladle hot chocolate into individual mugs, top with whipped cream.

                    Whipped Coconut Cream
                    Source: Reworded from The Gracious Pantry

                    1 14 ounce can regular coconut milk (do not use light milk)
                    1 tablespoon. agave or honey
                    1 teaspoon vanilla extract
                    1 tablespoon coconut cream (recipe follows)

                    1. Identify which end of the can you'll open with the can opener (for some cans that's the bottom) and place it that-end-down in the fridge for at least a day. The longer, the better. Gently turn the can over and open it. The cream should be solid at the (now) bottom of the can, with a layer of clear liquid on top. Pour off the clear liquid (great for use in smoothies or added to juice for a tropical touch).

                    2. Scoop the cream out of the can and into a medium bowl. Add honey and vanilla extract. Blend or whisk together until well combined.

                    3. Refrigerate coconut cream for a few hours to set; it will thicken slightly when chilled.

                    Note: If you find that even after chilling, the cream won’t stiffen up, put it into a blender with 1 package of unflavored gelatin. Let it sit out for about an hour. Once it’s thick as it should be, put it back into the fridge to chill further.

                    Monday, February 14, 2011

                    Mediterranean Vegetable, White Bean and Feta Penne

                    Loaded with fresh ideas, I pulled this recipe from my "to make" list for an easy weekend meal. When I showed the recipe to my husband, he requested that I add some chicken. I thought it would be a great addition, too, and decided that seasoning it with Herbs de Provence would be a great complement to the flavors in the dish.

                    CRW_0119c2


                    This dish is not only delicious, but a cinch to throw together.  The flavors are great (of course, I am a huge fan of feta cheese), and we discovered an added bonus - it is also delicious as a cold pasta salad for leftovers! 

                    Mediterranean Vegetable, White Bean and Feta Penne
                    Source: Slightly adapted from Clean Eating Magazine, February 2011, Page 40

                    6 oz whole-grain penne pasta
                    1 cup cooked canned white beans, drained and rinsed well
                    2 medium tomatoes, chopped
                    4 cloves of garlic, minced, divided
                    1 tbsp balsamic vinegar
                    1 tsp dried basil
                    1/4 tsp red pepper flakes
                    1/4 tsp sea salt
                    1 tbsp plus 2 tsp extra-virgin olive oil, divided
                    1 medium zucchini, cut into eighths lengthwise, then cut into 2-inch pieces
                    1 medium green bell pepper, cut into thin strips, then cut into 2-inch pieces
                    1/2 tsp dried rosemary
                    1 cup crumbled reduced-fat feta
                    2 boneless, skinless chicken breats (optional)
                    1 teaspoon Herbs de Provence (optional)

                    INSTRUCTIONS:
                    1. Cook penne according to package directions, adding beans during the last minute of cooking.

                    2. Meanwhile, in a medium bowl, combine tomatoes, 2 cloves garlic, vinegar, basil, pepper flakes and salt; set aside.

                    3. (Optional if using chicken) Heat 1 teaspoon oil in a large nonstick skillet on medium heat, tilting skillet to coat bottom lightly. Sprinkle chicken with herbs de provence, then add to skillet. Cook about 8 minutes on each side, or until cooked through. Remove from skillet.

                    4. Heat 1 teaspoon oil in same skillet over medium high heat, tilting skillet to coat bottom lightly. Add zucchini and bell pepper and cook for 4 minutes or until edges begin to brown, stirring frequently. Add remaining 2 cloves garlic and cook for 15 seconds, stirring constantly. Remove from heat, stir in tomato mixture and drizzle with remaining 1 tbsp oil. Chop chicken into bite size pieces and add to vegetable mixture. Cover to keep warm.

                    Four: Drain penne-bean mixture, place in a serving bowl, sprinkle evenly with rosemary and all but 1/4 cup feta. Spoon vegetable/chicken mixture over top and finish with remaining feta.

                    Friday, February 11, 2011

                    Orange Chipotle Chicken

                    My desire to finally get back in the kitchen was greatly influenced by the arrival of the latest issue of Clean Eating Magazine. I can’t get enough of this magazine. I’ve said it before and I will say it again – I seriously love it! The latest issue is chock full of recipes I can’t wait to try (many of them are listed as $2 per serving!), but this one jumped out at me immediately. The flavors sounded perfect, and I knew my husband would love them. Already having the ingredients in stock also helped to make it attractive (getting to the grocery store is somewhat more challenging these days).

                    CRW_0101c2

                    This meal has the perfect trifecta – quick to make, packed with great flavors, and easy on the wallet. I am sure we will be revisiting it soon!

                    I neglected to deseed the chipotles, and the dish was pretty spicy, so remember to remove them if you are sensitive to that.


                    Orange Chipotle Chicken
                    Source: Clean Eating Magazine, February 2011, Page 38


                    1 tsp chili powder
                    1/2 tsp ground cumin (cumin haters like me can use coriander)
                    1/2 tsp sea salt
                    1 tsp safflower oil
                    4 boneless, skinless chicken breasts (about 1 lb), rinsed and patted dry, pounded to 1/2-inch thick
                    1/3 cup fresh squeezed orange juice
                    2 tbsp pure maple syrup
                    1 tbsp chopped chipotle chiles in adobo sauce (remove seeds to keep the heat down)
                    1 tsp orange zest
                    2 cups cooked brown rice
                    1/4 cup chopped cilantro

                    Directions

                    One: In a small bowl, combine chile powder, cumin, and 1/4 tsp salt. Heat oil in a large nonstick skillet on medium-high. Tilt skillet to coat bottom lightly. Season both sides of chicken with chile-cumin mixture and cook for 3 minutes per side or until no longer pink in center. Remove from skillet and set aside.

                    Two: Add orange juice and maple syrup to juice and bits left in skillet and cook for 1 minute to thicken slightly (until it measures 1/4 cup liquid) stirring constantly. Remove from heat, stir in chipotle chiles in adobo sauce and orange zest. Add chicken back to skillet, return to heat and cook for 1 minutes on medium high turning constantly.

                    Three: In a medium bowl, combine rice, cilantro and remaining 1/4 tsp salt. Serve chicken over rice and spoon any excess glaze over top of chicken pieces.

                    Nutritional Information (per serving: 3 oz chicken and 1/2 cup rice):
                    Calories: 283
                    Fat: 4g
                    Sat. Fat: 1g
                    Carbs: 32g
                    Fiber: 2g
                    Sugars: 8g
                    Protein: 29g
                    Sodium: 337 mg
                    Cholesterol: 32 mg

                    Thursday, February 3, 2011

                    Quinoa Vegetable Soup

                    IMG_0017c

                    The snow has been piling up around here, and that generally means one things: comfort food. In an effort to keep things healthy around here, I turned to this soup recipe for something warm, comforting, and most of all - filling!

                    IMG_0030c

                    I didn't have any marjoram (and wasn't about to go out to the store for some), but I found a spice blend in my cabinet that seemed like it would work well. I also used chicken broth, since that's what I had on hand. This is a delicious soup that is so easy to throw together. It's a great way to get in some vegetables and grains, so you can feel a little less guilty about some other comfort foods calling your name!

                    Quinoa Vegetable Soup
                    Yield: Approximately 4 quarts
                    Source: The Gracious Pantry

                    • 8 cups vegetable broth + 8 cups vegetable broth on reserve
                    • 2 cups uncooked quinoa (rinsed well, unless you buy pre-rinsed)
                    • 4 large carrots, peeled and sliced
                    • 1 small bunch celery, cleaned and sliced
                    • 1 small head broccoli, washed and chopped
                    • 2 lbs. mushrooms, washed and sliced
                    • 1 red onion, peeled and diced
                    • 2 tbsp. garlic powder
                    • 2 tbsp. onion powder
                    • 1 tsp. thyme
                    • 2 tsp. celery seed
                    • 1 tbsp. marjoram
                    • 2 tbsp. olive oil
                    • 1 vegetable bouillon cube

                    Directions

                    Step 1 – Saute the onions and mushrooms over low-medium heat in the olive oil until the onions are translucent and the mushrooms have completely wilted.

                    Step 2 – In a large soup pot (a 4 quart pot), combine 8 cups of broth, carrots, celery, broccoli, onion/mushroom mixture, bouillon cube and spices. Bring to a boil.

                    Step 3 – When the soup is at a full, rolling boil, add the quinoa.

                    Step 4 – Reduce heat to a simmer. Cook until the vegetables are soft and the quinoa is transparent.

                    Step 5 – Add extra vegetable broth as needed to maintain a soupy consistency.

                    Friday, December 17, 2010

                    Frozen Banana Delight

                    As we enter the holiday season, filled with tempting treats loaded with fat and sugar, I thought I'd show you an easy alternative that might help curb your cravings for treats that don't fit a clean eating lifestyle. 

                    IMG_0030c

                    Otherwise known as “one ingredient ice cream” or “banana ice cream,” this super easy treat is a cool, creamy alternative to ice cream.  It can be enjoyed in it’s simplest form – with just bananas, or with a few key additions to punch up the flavor. My favorite additions are peanut butter and cocoa powder!

                    IMG_0025c

                    Frozen Banana Delight

                    1 ripe banana
                    1 tablespoon natural peanut butter (optional)
                    1 teaspoon cocoa powder (optional)

                    Slice banana into chunks and freeze in a single layer on a parchment lined plate or cookie sheet. Once frozen, place all ingredients in a blender or food processor. Blend until it is transformed into a creamy treat. You may need to intermittently stop the processor or blender to scrape down the ingredients.

                    Wednesday, December 1, 2010

                    Mexican Shrimp Burgers

                    My husband was originally a little skeptical about the idea of shrimp burgers, but he was nice enough to wait and tell me that AFTER I made them. These burgers totally won him over. We both agree that they are fantastic, and definitely something different! I love that they are actually relatively easy to prepare and being able to use frozen shrimp, which thaw quickly, makes it even more attractive.

                    IMG_0012c
                    Mexican Shrimp Burgers
                    Source: slightly adapted from Everyday GourmetFN

                    1 pound medium shrimp, shelled and deveined
                    1 egg
                    2 tablespoons chopped cilantro leaves
                    2 garlic clove, peeled
                    3/4 cup whole wheat bread crumbs, plus more as needed
                    1 poblano chile, roasted, peeled, stemmed, seeded, and diced
                    1 teaspoon sea salt
                    1/2 teaspoon freshly ground black pepper
                    2 tablespoons vegetable oil

                    Avocado Aioli:
                    1 Hass avocado, halved, pitted, and peeled
                    1/4 cup plain greek yogurt
                    1 tablespoon fresh lime juice
                    2 medium garlic cloves, peeled
                    1 serrano chile, stemmed, halved and seeded
                    2 tablespoons chopped cilantro leaves
                    Sea salt and freshly ground black pepper

                    6 whole wheat burger buns, split in half
                    2 medium tomatoes, or pico de gallo
                    6 lettuce leaves or a mixture of baby lettuce leaves

                    Directions

                    Burgers:
                    In a food processor, combine the shrimp, egg, cilantro, garlic, 3/4 cup bread crumbs, poblano chile, salt, and pepper. Process until the mixture is a coarse puree. (If the mixture is too wet, add additional bread crumbs, 1 tablespoon at a time, until the mixture can be molded easily). Form the mixture into 4-6 patties and put on a plate and store in the fridge to firm up while you make your aioli.

                    Avocado Aioli:

                    Scoop the avocado pulp into the bowl of a food processor. Add the yogurt, lime juice, garlic cloves, serrano chile and cilantro. Process until smooth. Season with salt and pepper, to taste.

                    Heat the oil over medium-medium high heat in a non stick skillet. (because the shrimp doesn’t have a lot of fat, the oil will help develop a nice crust). Add burgers to pan, gently sear until golden, about 3 minutes per side, depending on the thickness. Cover burgers while cooking to ensure that the shrimp will cook through. Do not over cook the burgers! Like anything using shrimp, it will taste best when the shrimp are just cooked through.

                    To assemble:

                    Serve the shrimp burgers on buns, topped with avocado aioli, sliced tomato or pico de gallo, and lettuce.

                    Wednesday, November 17, 2010

                    Chicken Fried Rice with Bok Choy

                    My favorite farmer's market vendor ended up with a surplus of bok choy that needed to be used up.  He generously offered me a second bag for free, so I came home and scoured through my recipe list to see what I could make.  This recipe caught my eye because it was simple to make, I had the remaining ingredients on hand, and it would use up most of the bok choy!

                    IMG_0005c

                    I honestly wasn't expecting much from this recipe, but it really turned out great! My husband insisted that this be made part of the regular rotation. I am happy to oblige, since it was so easy and delicious!

                    Chicken Fried Rice with Bok Choy
                    Source: Slightly adapted from Everyday Food, December 2008
                    Serves 4
                    (This recipe followed another recipe in the magazine, which had instructions for cooking the rice and chicken.  I have amended the chicken cooking instructions.)

                    • 3 boneless skinless chicken breasts, about 1 pound 
                    • 2 tablespoons vegetable oil, such as safflower
                    • 2 large eggs, lightly beaten
                    • Coarse salt and ground pepper
                    • 1 pound bok choy, cored and coarsely chopped
                    • 1 medium onion, finely chopped
                    • 2 garlic cloves, minced
                    • 3 cups cooked brown rice
                    • 1 tablespoon grated peeled fresh ginger
                    • 2 tablespoons rice vinegar
                    • 2 tablespoons soy sauce

                    Directions

                    1. Preheat oven to 350 degrees F.  Line a baking sheet with foil, and spray lightly with olive oil.  Place chicken breasts on foil, spray lightly with olive oil, and season with salt and pepper.  Bake about 30 minutes, or until no longer pink on the inside (inside temperature of 165 degrees F).  Set aside to cook, then chop into cubes.  This step can be done ahead of time and stored in the refrigerator in an airtight container.

                    2. In a large nonstick skillet, heat 1 tablespoon oil over medium. Add eggs; season with salt and pepper, and cook while stirring to break it up into pieces, until set, 1 to 3 minutes. Set cooked eggs aside (reserve skillet).

                    3. In skillet, heat remaining tablespoon oil over medium-high. Add bok choy, onion, and garlic; season with salt and pepper (skillet will be very full). Cook, stirring frequently, until bok choy is crisp-tender, 2 to 4 minutes.

                    4. Add rice, chicken, eggs, ginger, vinegar, and soy sauce. Cook, tossing, until heated through, 3 to 5 minutes.

                    Monday, November 15, 2010

                    Spicy Baked Chicken Tenders

                    A few weeks ago, my husbands schedule changed and his work days got longer.  As a result, he came home hungry and ready to eat... something.  Though his days are longer, he still gets home before me, so I started thinking of ideas that would be easy for him to make quickly.  I decided to try making chicken tenders from my crispy baked chicken recipe, but changing it up and making them spicy. 

                    My husband loved the idea, and has been making his own little snack wraps (chicken tenders in a tortilla with lettuce and cheese) every week after work.  It's taken me a few weeks to perfect the combination of ingredients, and maintain the level of spicy flavor after baking, but I think I finally got it right.

                    IMG_0038c
                    Spicy Baked Chicken Tenders
                    Yield: 
                     Note: lately, I've been out of flax seed and breadcrumbs, so I made the substitutions below.  It's fun to experiment with different combinations!

                    3-4 chicken breasts, sliced into tenders
                    2 egg whites (I sometimes go with 1/4 cup egg whites from a carton)
                    1/4 cup Frank's hot sauce
                    3 tablespoons cornstarch
                    3/4 cup wheat germ
                    1/4 cup plain dried breadcrumbs, or oat bran
                    1/4 cup ground flax seed, or cornmeal
                    2 tablespoons taco seasoning (recipe follows)
                    1 teaspoon crushed red pepper flakes
                    1/2 teaspoon salt
                    1/4 teaspoon fresh ground black pepper

                    Combine egg whites, hot sauce, and cornstarch in a shallow dish or bowl.  Whisk to combine thoroughly.   Combine wheat germ, breadcrumbs/oat bran, flax seed/cornmeal and seasonings in a shallow dish.  Dip chicken in egg white mixture, then in breading mixture. Shake off excess breading and place on a baking sheet fitted with a rack (to keep chicken elevated when cooking).  Lining the baking sheet with foil is optional for easy cleanup.  Bake chicken at 350 degrees for about 20 minutes, or until chicken is cooked through.

                    Taco Seasoning
                    From: Allrecipes

                    ~ 1 tablespoon chili powder
                    ~ 1/4 teaspoon garlic powder
                    ~ 1/4 teaspoon onion powder
                    ~ 1/4 teaspoon crushed red pepper flakes
                    ~ 1/4 teaspoon dried oregano
                    ~ 1/2 teaspoon paprika
                    ~ 1 1/2 teaspoons ground cumin (we use coriander)
                    ~ 1 teaspoon sea salt
                    ~ 1 teaspoon black pepper

                    Wednesday, October 27, 2010

                    Chicken Breasts with a Mustard Caper Pan Sauce

                    We have become huge fans of the chicken-with-pan-sauce type of meal. I think it's a great way to add variation to otherwise plain old chicken, while still begin quick to prepare and very flavorful. Another great aspect of this category is that small changes to the sauce, which can often be done with items already in your pantry or fridge, can yield very different dishes.

                    IMG_0002c

                    I'd been wanting to make this recipe for quite a while, and when the time finally came, I saw it as an opportunity to use up some artichoke hearts that were in the fridge. They were a great addition to an already wonderful dish!

                    Chicken Breasts with a Mustard Caper Pan Sauce
                    Source: Slightly adapted from My Italian Grandmother

                    • 2 boneless skinless chicken breasts
                    • approx 1/2 cup chicken stock
                    • 1 tablespoon unsalted butter (skip the butter and stick with oil for a clean meal)
                    • 1 -2 tablespoons of extra virgin olive oil
                    • 1 tablespoon whole wheat flour
                    • 1 generous tablespoon of dijon mustard
                    • 2 cloves of garlic, minced
                    • 2 teaspoons of capers
                    • 4 artichoke hearts, quartered
                    • 1 tablespoon of chopped fresh parsley
                    • salt and pepper, to taste

                    Directions:

                    Season chicken with salt and pepper. Heat 1 tablespoon of oil and the butter in a saute pan (stainless steel will work best) over medium heat. Saute chicken on both sides then remove to a plate. If the pan is dry add a little more oil and the garlic. Do not let garlic burn or it will taste bitter (lower the heat if necessary). Cook the garlic for a minute and add flour. Allow flour to cook for 1 minute and stir. Turn heat up again if you lowered it an add stock while stirring with wooden spoon or whisk. Add mustard, capers, and artichokes and season with pepper. Taste it before you add salt and adjust salt and mustard accordingly. If you want your sauce to thicken reduce it further, or if you want more sauce add a little more stock and let it reduce. Add parsley. When your sauce is done add the chicken to the pan with and toss to coat. Cover and let it cook for another 5-10 mins (depending on the thickness of your chicken) so chicken is cooked through.

                    Wednesday, September 29, 2010

                    Whole Chicken in a Crockpot

                    This is definitely not an earth shattering recipe, and it's barely a recipe at all! I thought I would just share a few tips that I've picked up that have made things easier for me when cooking a whole chicken in the crockpot.

                    It's really quite a marvelous thing - season a whole chicken, pop it in the crockpot, let it do it's thing for a few hours, and you have fall-off-the-bone chicken, ready to eat! I've been making this for a few weeks now and using the chicken for lunches during the week. One week I decided to roast the chicken in the oven, and decided I greatly prefer the crockpot. The meat truly does fall off the bone, which makes it really easy to separate out.

                    Whole Chicken in a Crockpot

                    One whole chicken
                    olive oil
                    seasoning of your choice
                    one lemon

                    Start by preparing the crockpot. I like to use crockpot liners for easier (and faster - don't have to wait for the crock to be cool enough to handle) clean up. Make 3 balls out of tin foil (about 2-3 inches in diameter) and place in triangular pattern in the crockpot. If available, place a rack on top of the foil balls. I have one that is just the perfect size, and I have found that it makes it easier to remove the chicken in one piece when it's done cooking. The chicken will release a lot of juice while cooking, so the foil balls will help keep it elevated, but the rack will help it come out of the pot without falling apart and dropping back into the liquid.

                    IMG_0046c

                    Prepare chicken by removing the giblets, rinsing well inside and out, and patting dry with paper towels. There are many ways to season the chicken - I keep it pretty simple with a little olive oil and some home-mixed Emeril's Essence. Fresh herbs + butter is another great way to go. Rub the oil and seasonings all over the chicken and under the skin to help flavor the breasts. Cut the lemon into quarters and stuff into the cavity.

                    Place chicken on rack in crockpot, and cook on low for 6-7 hours or on high for 4 hours. Remove chicken by lifting from the rack. I find it helpful to wedge a strong, metal spatula underneath the rack to help lift it up and out. Then just enjoy the chicken!

                    IMG_0049c