I've moved! Follow me over to The Balanced Baker.


Wednesday, February 11, 2009

Samoas Ice Cream

I am SO excited that it is that time of year again. My order is in. I am eagerly awaiting the arrival of.... Girl Scout cookies! My all time favorite is thin mints, but samoas are a close second (caramel delites for you ABC bakers folk). This year, I decided to make an ice cream based on the samoas.


What are samoas? In case you live under a rock, I'll explain. Vanilla cookie, layered in luscious caramel, sprinkled with coconut, and drizzled with stripes of chocolate. YUM is what samoas are! There are probably many ways to create an ice cream based on the samoas cookie. Of course, I have to be inventive, since I don't have any cookies in hand yet and this prohibits me from making some vanilla ice cream and adding chunks of samoas. I decided to go out on a limb and start with a base of coconut ice cream, swirled with rich homemade caramel, and chock full of vanilla shortbread cookie bits dipped in chocolate. The result? Grown-up version of a favorite childhood cookie.

Samoas Ice Cream
Coconut ice cream adapted from Chocolate and Zucchini
Caramel and (adapted) shortbread from Baking: From My Home to Yours by Dorie Greenspan

~ 1/2 cup egg beaters
~ 1 can (13 fl. oz.) reduced fat unsweetened evaporated milk
~ 1 can (13 fl. oz.) coconut milk
~ 1 to 2 tablespoons light rum (optional)
~ 2 teaspoons pure vanilla extract
~ 3/4 cup sugar or 1/3 cup agave nectar
~10 chocolate covered shortbread cookies (store bought or homemade), crushed
~1/2 cup caramel sauce (store bought or homemade)

In a medium bowl, whisk together the egg beaters, evaporated milk, coconut milk, rum, vanilla, and sugar until blended. Refrigerate at least four hours, or overnight. Whisk again before using, and freeze according to your ice cream maker's instructions. In the last 5 minutes of churning, add the chocolate covered cookie bits. Layer 1/2 the ice cream in a freezer container, then smooth over 1/4 cup of completely cooled caramel sauce. Repeat, then freeze container to cure ice cream.

Brown Sugar Shortbread Cookies
Yield: about 10 cookies

~1/2 cup all-purpose flour
~1 Tablespoon plus 1 teaspoon cornstarch
~pinch salt
~5 Tablespoons unsalted butter, at room temperature
~1/4 cup (packed) light brown sugar
~about 1 cup chocolate chips, for dipping cookies

Sift together the flour, cornstarch, salt and cloves. Working with a stand mixer, preferably fitted with a paddle attachment, or with a hand mixer in a large bowl, beat the butter and brown sugar together on medium speed for about 3 minutes, until the mixture is very smooth. Reduce the mixer speed to low and add the dry ingredients, mixing only until they disappear into the dough. Don’t work the dough much once the flour is incorporated.

Using a rubber spatula, transfer the soft, sticky dough to a gallon-size zipper-lock plastic bag. Put the bag on a flat surface, leaving the top open, and roll the dough into a 9×10⁻¹/2-inch rectangle that’s 1/4-inch thick. As you roll, turn the bag occasionally and lift the plastic from the dough so it doesn’t cause creases. When you get the right size and thickness, seal the bag, pressing out as much air as possible, and refrigerate dough for at least 2 hours, or for up to 2 days.

Position the racks to divide the oven into thirds and preheat the oven to 350 degrees. Line two baking sheets with parchment or silicone mats. Put the plastic bag on a cutting board and slit it open. Turn the firm dough out onto the board (discard the bag) and, using a ruler as a guide and a sharp knife, cut the dough into 1-1/2 inch squares. Transfer the squares to the baking sheets and carefully prick each one twice with a fork, gently pushing the tines through the cookies until they hit the sheet. Bake for 18 to 20 minutes, rotating the sheets from top to bottom and front to back at the midway point. The shortbreads will be very pale - they shouldn’t take on much color. Transfer the cookies to a rack.

When cookies are cool, melt chocolate in a double boiler or in the microwave at 30 second intervals. Dip the cookies in chocolate and lay on a parchment lined baking sheet. Refrigerate until set, then break up into chunks.

Caramel Sauce
~1 cup sugar
~3 T water
~1 T light corn syrup
~3/4 cup heavy cream
~1 T unsalted butter

Put the sugar, water, and corn syrup in a medium saucepan and stir to combine. Heat over medium heat without stirring, until the caramel turns a deep amber color, 5-10 minutes. Lower the heat, stand back from the saucepan and add the cream and butter. Stir to smooth and calm down the caramel. Remove the pan from the heat. Pour the caramel into a heatproof jar and cool until it is slightly warm-for about an hour. The sauce will keep in the fridge for about a week. Just reheat in the microwave.

Monday, February 9, 2009

Recipe Organization

I find a lot of people struggling with how to organize their recipes. Some keep it all electronic, some keep it all on paper. I have a mix of the two. I would love to be 100% electronic, but my kitchen is a little short on counter space, and I'm very messy when I cook. My kitchen is no place for my laptop. ;-)


I get my recipes from a variety of sources. Online recipes that I have yet to make are stored one of two ways. All other recipes, plus online ones that I have made and like, are filed in a binder and then listed in a central excel spreadsheet for easy viewing (more on that later). Let's start with online organization:


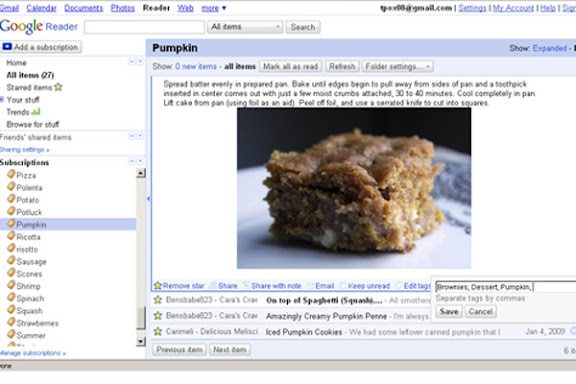
Online Blogs: When I see a recipe I like, I subscribe to the blog in Google Reader (if I haven't already) and then star the recipe as well as add tags. I like to add tags based on ingredients (chicken, cream cheese, banana), as well as, category and subcategory of items (Dinner, Dessert, Cupcake, Burgers). This helps me both when I'm looking for dinner ideas and when I'm trying to figure out what the heck to do with extra cream cheese.


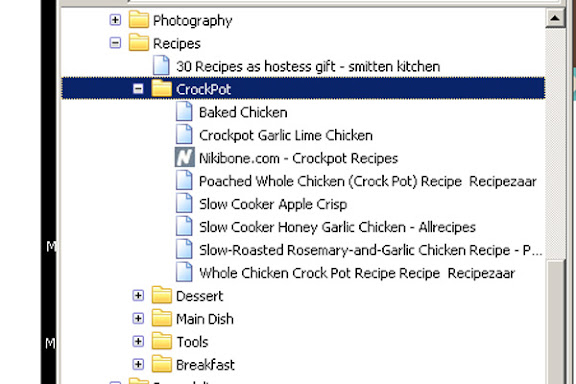
Other Online Recipe Sites: I bookmark other sites in categorized folders, and edit the title so the recipe name is readily visible when I view my bookmarks.


Now, as I mentioned, the other recipes are all listed in one central excel worksheet. I do this so I can quickly and easily search for ideas based on ingredients or categories.

Magazines: I currently subscribe to Cooks Illustrated and Everyday Food. When each issue arrives, I open up the excel spreadsheet and start flipping through the magazine. Anything that looks like something we'd like gets added to the spreadsheet, with "MAKE" listed in the column for Rating. If there is only one or two recipes of interest in a particular magazine, I'll just copy them over, being sure to include the original source, and keep them in the binder. No sense taking up all that space for just one or two ideas!

Cookbooks: I have a number of cookbooks, and each one has been numbered with a little sticker for easy referencing. When I make something that I like from one of the cookbooks, it gets entered into the excel spreadsheet and the number of the book is used to identify which book it came from.


The Binder: This houses recipes from friends and family, or tested internet recipes. I received a box full of recipes at my bridal shower from all those in attendance - which was a great idea! They were all on 3x5 index cards, so I've continued with this pattern. When I am ready to try an online recipe, I copy it down on a 3x5 card and use that in the kitchen. If we love the recipe, I add it to the excel spreadsheet and give it a home in the binder. The binder is organized by the following categories: Appetizer, Bread, Breakfast, Dessert, Fish, Pasta, Poultry, Sauces, Vegetarian, and Drinks.


I got some 4x6 photo sheet protectors and can fit 8 recipes per sheet. The one problem there that I didn't foresee is that the sheet protectors are as long as the tabs on the dividers, so you can't see them all. Not a huge deal for me. These are all loaded in 1" binder (for now!) with a flexible binding so I can fold it over and use in my cookbook holder in the kitchen. Crockpot recipes are stored similarly, in a separate binder. (very soon the label maker will make it's presence known to the binder!)


The Spreadsheet: The excel spreadsheet lists all tested recipes, plus any that are in the binder that I have yet to make. There are six columns:
~Recipe - the name of the recipe
~Location - Where it is stored. BPL26 stands for Binder, Poultry, 26th slot (yes, that's specific, but when you have 50 some odd recipes in that category, you need more help narrowing it down!). EF-59-70 stands for Everyday Food, Issue 59, page 70.
~Category - this relates to the section of the binder it is, or would be, located in. This is necessary for the recipes stored in cookbooks and magazines.
~Tags - here I indicate main dish, side, cupcake, ice cream, etc. It just gives me another angle to sort with... if I come in knowing I need a cupcake recipe, I can sort that column or search for cupcakes.
~Ingredients - Here I list many of the ingredients of the recipe, which helps in two ways. When perusing for dinner ideas, it's a quick way to see if I have what's necessary... fresh lemons for instance. It also acts as a search tool when I have a leftover ingredient and want to use it up.
~Rating - since I am only putting good recipes in the binder, it seems silly to have this, but I still like having a way to denote minor differences in preferences, or maybe recipes that could use some tweaking. I also use this column to specify which recipes have yet to me made, by entering "make" in this column.


Now, when it comes time to plan my meals for the weekend, I have three places to search. I can go to my cookbooks or Google Reader for new recipe ideas, or I can go to my excel spreadsheet and look up old favorites. Same goes for if I have a pesky cup of buttermilk left and need to use it up. I hope this provides you with some ideas on how to better organize your recipes so THEY work for YOU!

Friday, February 6, 2009

Chicken San Marco


I am always looking for new ideas for the crockpot. We have a few recipes we like, but in the winter I use it a lot during the week and hate making the same thing week to week. I cook overnight and we bring the (sometimes good, sometimes bad) results to work for lunch. Since I'm portioning it out in the morning when I am (usually) late for work, I never take pictures so I can share. However, this recipe is definitely worth sharing!

I need easy recipes that don't require lots of additional cooking when the crockpot is done (to say, thicken a sauce or add a few last minute ingredients). This definitely lends itself to that as it can be served alone if you are watching your carb intake, or with ready made rice in your freezer that is waiting for you. We love this recipe, particularly how it flavors the vegetables. The carrots are my favorite; they remind me of carrots boiled with ham or corned beef - soft and slightly salty. I changed it a bit to suit our tastes... took out the peppers and shifted around the proportions on the veggies.


Chicken San Marco

Slightly adapted from Family Crockpot Recipes

1.5 to 2 cups broccoli florets, cut small
1 large onion, diced
4 medium carrots, peeled and sliced
1 tablespoon chopped garlic
1 teaspoon chicken bouillon
1 (8 ounces) can Italian plum tomatoes, with juice, or 3 plum tomatoes chopped
2 tablespoons tomato paste
1 teaspoon oregano
1 teaspoon rosemary
1 teaspoon garlic powder
3/4 teaspoon salt
1/2 teaspoon pepper
2 tablespoons cornstarch
2 lbs boneless skinless chicken breasts, cut into 1 inch cubes or left whole*

Place broccoli, onions, carrots, and tomatoes in the bottom of crockpot. Place the chicken on top. Mix together remaining ingredients and spread over chicken. Cook on low for 6 to 8 hours or on high for 3 to 4 hours. Serve... however you like! I think it would be good with pasta or brown rice, but I eat just eat it as is... delicious chicken and vegetables!

*I always use frozen chicken because I am too lazy to thaw it. We've never had any problems.

Wednesday, February 4, 2009

Cranberry Upside-Downer

I decided that since it is now February, it was time to use up the cranberries that I had been hoarding in my freezer since fall (and make more room for chili!). I flipped through my copy of Baking: From My Home to Yours, and saw the Cranberry Upside-Downer. It looked simple, I had all the ingredients on hand, and seemed like it would be delicious. I made some vanilla ice cream to go along with it, as Dorie suggests (and I am never one to turn down ice cream!). This turned out SO good! I will definitely be making this one again next winter!


Cranberry Upside-Downer
From Baking: From My Home to Yours, by Dorie Greenspan

~1 cup all purpose flour
~1 tsp baking powder
~1 tsp ground cinnamon
~1/4 tsp salt
~1 3/4 sticks (14 Tablespoons) unsalted butter, room temperature
~1 cup minus 2 Tablespoons sugar
~1/4 cup chopped walnuts or pecans
~2 cups cranberries-fresh or frozen(if frozen, do not thaw)
~2 large eggs
~1 tsp vanilla extract
~1/3 cup whole milk
~1/3 cup red currant jelly, for glazing the cake

Center a rack in the oven and preheat the oven to 350F. Put a 8x2 inch round cake pan on a baking sheet. Whisk together the flour, baking powder, salt and cinnamon. Melt 6 Tablespoons of the butter in a small saucepan. Sprinkle in 6 Tablespoons of the sugar and cook, stirring, until the mixture comes to a boil. Pour this evenly over the bottom of the cake pan, then scatter over the nuts and top with the cranberries, smoothing the layer and pressing it down gently with your fingertips. (If frozen berries cause the butter to congeal, don’t worry - everything will melt in the oven.) Set aside.

Working with a stand mixer, preferably fitted with a paddle attachment, or with a hand mixer in a large bowl, beat the remaining stick of butter on medium speed until smooth. Add the remaining 1/2 cup of sugar and continue to beat until pale and creamy, about 3 minutes. Add the eggs one at a time, beating for 1 minute after each addition and scraping down the bowl as needed. Pour in the vanilla. Reduce the mixer speed to low and add half of the dry ingredients, mixing only until they disappear into the batter. Mix in the milk, then the rest of the dry ingredients. Spoon the batter over the cranberries and smooth the top with a rubber spatula.

Bake for 40-45 minutes, or until the cake is golden and a thin knife inserted into the center of the cake comes out clean. Remove it from the oven and run a blunt knife between the sides of the pan and the cake. Carefully turn the cake out onto a serving platter. If any of the berries stick to the pan-as they might-just scrape them off with a table knife and return them to the cake.

Warm the jelly in a small saucepan over low heat, or do this in a microwave oven.
Gently brush the glaze over the hot cake.

Monday, February 2, 2009

Oreo Cupcakes


I saw these cupcakes and knew they would be perfect for an upcoming holiday party. Once the guests found out what I was making, they couldn't stop talking about it! And really, what sounds better than rich, chocolatey cupcake filled and topped with a cool, creamy whipped frosting...with a surprise oreo in the bottom!


I saw them at Dinner with Danielle, and based on the reviews, wanted to go with the devil's food cake recipe she used. The filling and frosting recipe was provided by the Bumbling Baker, but I had one problem with it. I combined the two recipes since they were about the same and why make two batches of something when you can just make one? I don't know if I just skimped on the filling part, but I had a ton of frosting leftover! So below, I've listed the recipe as Danielle did. Also, a note about cutting the oreos in half for the top... I tried cutting them at an angle, with the tip of the knife on the cutting board and pressing down into the oreo - this did not work! They kept cracking and I couldn't use some of the halves since they crumbled so much. I found that they split much better when the blade is even across the top of the cookie, with one firm, swift press straight down.


Ultimately, these are my second favorite cupcakes. (The banana split cupcakes hold a special place in my heart!) The whipped cream frosting is the perfect complement to the chocolate cake, and well, oreos just make everything better. As for that extra leftover frosting...? I see some cookies and cream ice cream in my future. Free Smiley Face Courtesy of www.FreeSmileys.org


Oreo Cupcakes
Cupcake from Williams-Sonoma Cakes and frosting from Little Cakes From the Whimsical Bakehouse; directions adapted slightly.
Yield: 24 cupcakes

For the cupcakes:
~ 2 1/3 cups all-purpose flour
~ 1 cup unsweetened cocoa powder, sifted
~ 1 1/2 tsp. baking powder
~ 1/2 tsp. baking soda
~ 1/2 tsp. salt
~ 12 Tbs. (1 1/2 sticks) unsalted butter, at room temperature
~ 2 cups firmly packed light brown sugar
~ 2 tsp. vanilla extract
~ 4 eggs, at room temperature
~ 1 1/2 cups buttermilk, at room temperature
~ 24 oreos, one side twisted off and reserved for frosting

Preheat an oven to 350°F. Place cupcake liners in cupcake pan. Place one oreo in each liner, creme side up.

In a large bowl, sift together the flour, cocoa powder, baking powder, baking soda and salt; set aside. In another large bowl, using an electric mixer, beat the butter on medium speed until smooth. Gradually add the brown sugar and continue beating until fluffy. Beat in the vanilla. Add the eggs one at a time, beating well after each addition.

Reduce the speed to low and add the flour mixture in three additions, alternating with the buttermilk and beginning and ending with the flour, beating after each addition.

Divide the batter between the prepared liners. Bake until a toothpick inserted into the center of a cake comes out clean, 19 to 24 minutes. Transfer the cupcakes to a wire rack and let cool for 15 minutes. Let the cupcakes cake cool completely before filling and frosting.

For the frosting/filling:

~ 1 1/4 cups whipping cream
~ 2 tablespoons powdered sugar (I just pulsed some granulated sugar in a mini food processor)
~ 1/4 teaspoons vanilla extract
~ 1/2 cup Oreo cookie crumbs, made from reserved oreo sides

In the bowl of an electric mixer, whip the cream, sugar and vanilla until stiff. Gently fold in the cookie crumbs. Scoop the mixture into a piping bag (or gallon sized ziplock bag), and using a 1M tip, inject filling into each cupcake by sticking the tip into the middle of the cupcake and squeezing a bit. Frost the cupcakes and top with 1/2 of an oreo.

Friday, January 30, 2009

Cinnamon Nutella Cake Bites


Nutella holds a special place in my heart. I've made nutella cupcakes, ice cream, and muffins, all with great success. For an upcoming (after?) holiday party, I decided to take them in a new direction - cake bites! I was inspired to create them after seeing strawberry vanilla cake bites in my google reader. What could be better than nutella with cinnamon cake, enrobed in more chocolate?? YUM! (Admittedly, I'm still stuck on the cinnamon nutella ice cream combination.)


I decorated the tops with thinned royal icing so people could tell the difference between the two. I love the flavor combination of the strawberry vanilla, but toyed with the recipe and ultimately think it would be better as written (see my note with the recipe). The cinnamon nutella bites were SO good, but I really didn't expect anything less! Can you really go wrong there? I think not. I even snuck some chopped hazelnuts into the center. Free Smiley Face Courtesy of www.FreeSmileys.org


Cinnamon Nutella Cake Bites
Cake recipe from Baking: From My Home to Yours, by Dorie Greenspan
Makes approximately 30 cake bites (1 tablespoon size)

- 1 1/4 cups plus 2 tablespoons sugar
- 1 Tablespoon ground cinnamon
- 1 1/4 cups all-purpose flour
- 2 teaspoons baking powder
- pinch of salt
- 3/4 cup whole milk
- 2 large eggs
- 1/2 teaspoons vanilla extract
- 1 stick plus 2 tablespoons unsalted butter, melted and cooled
- 1/2 cup nutella
- 1/8 to 1/4 cup chopped hazelnuts, or about 30 whole
- 12-14 ounces semisweet or milk chocolate, for dipping

Preheat oven to 350 degrees. Butter an 8 inch square baking pan, and line bottom with parchment or wax paper. Place pan on a baking sheet.

In a large bowl, whisk the flour, the remaining 1 1/4 cups sugar, the baking powder, salt and cinnamon. In another bowl, mix together milk, eggs and vanilla. Pour the liquid ingredients over the flour mixture, and whisk gently until you have a homogenous batter. Now, using the whisk or rubber spatula, fold in the butter with a light touch until the butter is absorbed. You'll have a smooth satiny batter. Scrape the batter into the pan. Smooth the top. Bake for 35-45 minutes, or until cake is puffed and beginning to pull away from the sides of the pan. A thin knife inserted into the middle will come out clean. Transfer cake to a cooling rack, and let it rest for 15 minutes before unmolding it onto another rack. Peel off the paper, and cool to room temperature.

Once fully cooled, break up the cake into a large bowl. Add the nutella and mix thoroughly. Shape into tablespoon sized balls, press 1 whole hazelnut or a few hazelnut pieces into the center of the ball, and reshape to close up the cake ball. Place in the refrigerator for at least 20 minutes to firm up the cake bites. Melt the chocolate in a double boiler, or in a microwave safe bowl at 30 second intervals until melted and smooth. Dip the chilled cake bites in the chocolate and thoroughly coat. Set cake bates on parchment line cookie sheets, and place in the refrigerator for 20 minutes to set the chocolate coating.


Strawberry Vanilla Cake Bites
adapted from The Gourmet Cookbook, as seen at Joy the Baker
Makes: approximately 30 cake bites (tablespoon size)
I thought the cake/preserves mixture was too dry, so I added a little extra preserves. Once completed, I thought they were too wet. Next time I'll stick to the recipe!

For the Cake:
~1 cup cake flour
~1 teaspoon baking powder
~1/4 teaspoon salt
~1/2 stick (4 Tablespoons) unsalted butter, softened
~1/2 cup sugar
~1 egg plus 1 egg white, at room temperature
~1 teaspoon vanilla extract
~1/3 cup whole milk

For the Strawberry Binding:
~1/3 cup strawberry preserves
~2 heaping Tablespoons of marshmallow creme

14 ounces milk chocolate for dipping.

To Prepare the Cake:
Put a rack in the middle of oven and preheat oven to 350 degrees F. Butter and flour one 8-inch round baking pan, knocking out excess flour. Sift together flour, baking powder and salt into a bowl.

Beat butter and sugar with an electric mixer, on medium high speed until pale and fluffy, about 3 to 5 minutes. Beat in eggs one at a time, then beat in vanilla, and beat until thoroughly blended, about 5 minutes. Reduce speed and add flour mixture and milk, alternately in 3 batches, beginning and ending with the flour mixture, and mix until batter is just smooth, do not overmix. Batter will seem loose.

Spread batter evenly into pan. Bake until cake begins to pull away from the sides of the pan, and a skewer inserted in the center comes out clean, 20 to 25 minutes. Cake will still be pale in color, not golden brown. Cool for 5 minutes in the pan on a rack, then invert on a rack to cool completely. While Cake cools, mix together the strawberry preserves and marshmallow creme.

When cake is completely cool, crumble into a large mixing bowl. Add the strawberry mixture and mix together with hands This will be messy. Mix until the cake and preserves are thoroughly incorporated.

Shape cake mixture into 1 inch balls or squares by pressing the cake mixture together with your fingers and rolling in the palms of your hand. Place the shaped cake bites on a baking sheet lined with parchment. Once all the bites have been rolled, cover and place in the fridge for at least 20 minutes.

Melt milk chocolate in the microwave, or over a double boiler. Dip chilled cake bites into the melted chocolate and place back onto the baking sheet. Once all balls are dipped, place in the fridge for 20 minutes to harden the chocolate.

Wednesday, January 28, 2009

Orange Sherbet


I've been looking to branch out from our usual mint chocolate chip or peanut butter ice cream, and orange sherbet came to mind as a past favorite of mine. I started with the basic ice cream recipe I've been using from Doc Wilson (sadly the site has been down for some time now), and after googling to get an idea of what goes in sherbet, I set out to mix up the base. At first, it wasn't sweet enough, but after a quick melting and re-chilling I was able to fix the problem! This turned out great - it's very refreshing with a bright citrus taste. My favorite way to serve is with jimmies (chocolate sprinkles for you non-New Englanders).


Orange Sherbet
Adapted from Doc Wilson's Old Time Vanilla Ice Cream

~1/4 cup egg beaters
~1/2 can of fat free sweetened condensed milk (7 ounces)
~6 Tablespoons white sugar
~juice of 4 oranges, about 10 ounces
~4 ounces heavy whipping cream
~6 ounces fat free half and half
~4 ounces skim milk (or 1%, or 2%, whatever you have)
~zest of 1 orange

In a large mixing bowl whisk together egg beaters, sweetened condensed milk, and sugar until thoroughly mixed. Add heavy whipping cream, half and half, skim milk, orange zest and orange juice. For the very best results (who wants anything less?), let the mix chill in the refrigerator for about four hours (or overnight) which allows the mix to age before freezing according to the directions with your ice cream freezer. Makes about 4 cups.

Monday, January 26, 2009

BB: Easy Sticky Buns

I learned a few things making this week's recipe for Barefoot Bloggers.

1. These are really really good (when not burnt).

2. I should pay more attention to potentially oozing brown sugar/butter all over my oven, because airing out a smoke filled kitchen with it's 10 degrees outside is less than enjoyable. (Secondary lesson here is to copy down the ALL the instructions, since the parchment lined baking sheet would have helped. Tremendously.)

3. I do not know how to voluntarily disconnect my smoke detector. (maybe this is a good thing?)

I don't have good pictures because I definitely had some issues, and I don't think I flipped them soon enough. When I did, the bottom had already hardened. Anyway... here's a glimpse of what could have been...


Easy Sticky Buns
from Back to Basics, page 240
Chosen by Melissa of Made by Melissa
Be sure to check out how everyone else faired, here.

Makes 12
We used to make really delicious sticky buns at Barefoot Contessa, but they took two days to make because the yeast dough needed to rise overnight in the refrigerator. I was dying to find a way to make them easier, so I decided to try baking them with Pepperidge Farm puff pastry dough, instead. OMG are they good … and they’re really easy to make! Light, flaky dough filled with brown sugar, toasted pecans, and sweet raisins — my friends go crazy when I make these.

12 tablespoons (1 1/2 sticks) unsalted butter, at room temperature
1/3 cup light brown sugar, lightly packed
1/2 cup pecans, chopped in very large pieces
1 package (17.3 ounces/2 sheets) frozen puff pastry, defrosted for the filling
2 tablespoons unsalted butter, melted and cooled
2/3 cup light brown sugar, lightly packed
3 teaspoons ground cinnamon
1 cup raisins (I used craisins)

Preheat the oven to 400 degrees. Place a 12-cup standard muffin tin on a sheet pan lined with parchment paper. In the bowl of an electric mixer fitted with the paddle attachment, combine the 12 tablespoons butter and 1/3 cup brown sugar. Place 1 rounded tablespoon of the mixture in each of the 12 muffin cups. Distribute the pecans evenly among the 12 muffin cups on top of the butter and sugar mixture.

Lightly flour a wooden board or stone surface. Unfold one sheet of puff pastry with the folds going left to right. Brush the whole sheet with half of the melted butter. Leaving a 1-inch border on the puff pastry, sprinkle each sheet with 1/3 cup of the brown sugar, 1 1/2 teaspoons of the cinnamon, and 1/2 cup of the raisins. Starting with the end nearest you, roll the pastry up snugly like a jelly roll around the filling, finishing the roll with the seam side down. Trim the ends of the roll about 1/2 inch and discard. Slice the roll in 6 equal pieces, each about 1 1/2 inches wide. Place each piece, spiral side up, in 6 of the muffin cups. Repeat with the second sheet of puff pastry to make 12 sticky buns.

Bake for 30 minutes, until the sticky buns are golden to dark brown on top and firm to the touch. Allow to cool for 5 minutes only, invert the buns onto the parchment paper (ease the filling and pecans out onto the buns with a spoon), and cool completely.

Friday, January 23, 2009

Glazed Chicken and Vegetables


Another recipe I found in the Better Homes and Garden cookbook was Glazed Chicken and Vegetables. We are always looking for different things to do with chicken, including a little variation from boneless, skinless chicken breasts. This looked like a great way to change it up.

We really enjoyed the combination of flavors here, though I think next time I'll make a little more sauce and baste the chicken with it more. It dripped off more than I wanted it to. Other than that, we thought it was great! I'll admit - I didn't eat the apples and will probably leave them out next time. :-)


Glazed Chicken and Vegetables
Reworded from Better Homes and Gardens Bridal Edition

~3 to 3.5 pound whole broiler-fryer chicken
~cooking oil
~3 medium potatoes, quartered (about 1 pound)
~6 carrots, sliced 1/2 inch thick (about 1 pound)
~1/2 cup honey
~1/4 cup mustard
~2 tablespoons butter
~2 tablespoons finely chopped onion
~2 teaspoons curry powder
~1/2 teaspoon garlic salt
~1/4 teaspoon crushed red pepper
~1/4 teaspoon ground ginger
~2 medium apples, cored and cut into wedges

Directions:

Rinse inside of chicken, pat dry with paper towels. Place chicken, breast side up, on a rack in a shallow baking pan (or large oven safe saute pan). Roast, uncovered, at 375 degrees for 45 minutes.

Meanwhile, cook potatoes and carrots in boiling water (or steam them) for 15 to 20 minutes or until nearly tender, then drain.

To make the glaze, combine honey, mustard and spices in a saucepan and bring to a boil, stirring constantly. Remove from heat and set aside. Discard drippings from roasting pan and arrange potatoes, carrots, and apples around chicken in pan. Spoon glaze over chicken, vegetables and apples. Roast, uncovered, for another 30 to 40 minutes, or until thigh reaches 180 degrees. Serve cooking juices over chicken and vegetables.

Wednesday, January 21, 2009

Cranberry Orange Muffins

I saw these on Good Things Catered and thought they'd be a great addition to the basket I was making for a friend that recently had surgery. Even though I found out a little too late that my orange extract had evaporated, they still turned out fabulous! I can't wait to make some that I can keep for myself!

Cranberry Orange Muffins
Source: Good Things Catered

~2 c. all-purpose flour
~1 Tbsp baking powder
~1/2 tsp salt
~2 large eggs
~1 c. milk
~2/3 c. sugar
~6 Tbsp unsalted butter, melted and cooled slightly
~1 tsp vanilla extract
~1/4 tsp orange extract
~2 Tbsp orange zest
~2 c. fresh cranberries

Directions:
-Preheat oven to 400 degrees and line a muffin tin with paper cups
-In a large bowl whisk together flour, baking powder, and salt
-In another bowl combine eggs, cream, sugar, butter, extracts and zest.
-Whisk until thoroughly combined.
-Add dry ingredients and fold until just moistened.
-Fold in cranberries and divide batter among muffin cups.
-Bake for about 14 minutes or until a toothpick inserted in the center of one comes out clean.
-Let cool 2 - 3 minutes before removing from pan.