
Monday, March 26, 2012
Movin' on up!
After nearly five (!) years here at Proceed with Caution, I decided it was finally it was time for a change. Check out my new home over at The Balanced Baker and see my newest sweet treat - Irish Trinity Cake!
Sunday, March 4, 2012
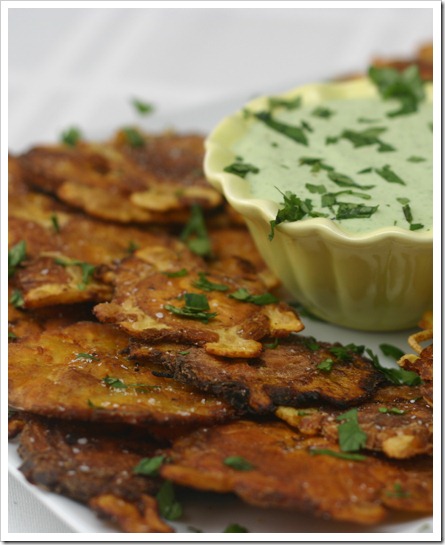
Tostones (fried plantains) with Creamy Garlic Cilantro Dip for a Virtual Baby Shower

I am so excited to be bringing you this recipe today, because it was made for a very special friend, Krystal, from Mrs. Regueiro's Plate. Krystal is a fellow Gleek, and the inspiration behind my Glee Cupcakes series. Today, I'm participating in a virtual baby shower for Krystal, who is expecting her first little one (appropriately nicknamed "Cookie") with her husband, Eric, in just 2 short months! As a tribute to their heritage, all the recipes for this baby shower will be inspired by the Filipino or Cuban cultures.
 I've been dying to make fried plantains, or tostones, since I discovered them during my brief stint at Columbia University. I spent one fabulous semester of graduate school up in Washington Heights, where a local restaurant, El Malecon, serves up the best chicken (and fried plantains) around. Krystal's baby shower finally gave me the occasion that I needed to take the plunge and try to make them at home.

These crisp fried plantains are a treat in and of themselves, but when paired with a cool, tangy, creamy dip - they are out of this world!
Tostones (fried plantains) with Creamy Garlic Cilantro Dip
 Source: Adapted from GoodVeg
Yield: Serves 2-4 as appetizers
Preparation time: 15 minutes
Cook time: 20 minutes
Total time: 35 minutes
Ingredients
- 2 green plantains
- 1-4 cups canola or safflower oil
- sea salt
- 4-5 cloves roasted garlic
- 1 cup sour cream or plain low fat greek yogurt
- 1/2 cup fresh cilantro, roughly chopped
- juice of one lime
- 1 green onion, roughly chopped
- pinch salt
- pinch fresh cracked pepper
Instructions
- To make the garlic dip: Add roasted garlic, sour cream/greek yogurt, cilantro, green onions, and lime juice to a food processor or blender. Process until well blended. Add salt and pepper to taste. Chill until tostones are ready.
- To peel the plantains: Start by running a paring knife 3-4 times along the length of the plantain, only going deep enough to slice the thick skin. Peel away the skin of the plantains.
- Slice the plantains, on the bias, about 1/4 inch thick. Place slices in a bowl of lightly salted water to prevent browning before cooking.
- Heat 1 to 4 cups oil (depending on the size of your cooking vessel) in a large pan over medium high heat (oil should reach 350-375 degrees F). Dry the plantains and carefully add to the hot oil, making sure not to crowd the pan. Fry the plantains 2-4 minutes on each side, then remove to a plate lined with paper towel.
- Carefully press the plantains between two sheets of wax paper, using a tortilla press, or the bottom of a large glass. Fry the smashed plantains another 1-2 minutes in the hot oil.
- Sprinkle with sea salt, and enjoy!
Tuesday, February 14, 2012
Valentine’s Pound Cake

I'm mildly obsessed with baking a surprise shape into a cake or cupcakes. I can envision something for almost every occasion - shamrocks for St. Patrick's Day, bunnies for Easter, stars for the 4th of July (or Rachel Berry), pumpkins for Halloween, and of course, hearts for Valentine's Day. I am only limited by my horrible 3-dimensional carving skills or my supply of mini cookie cutters. Cupcakes are easy because you can use the cookie cutters to create your cake inserts, but baking into a cake takes more... artistic talent.

A heart shape is relatively easy to carve free-hand, and since I chose pound cake as a medium, all I needed was one long piece of cake for carving. To make this cake, I first baked one pound cake with enough red food coloring to make it pink. I let it cool completely, and froze it to help make it stiffer for carving. Then I carved out the heart shape with a good knife. I prepared the batter for a second pound cake, and inserted the pink heart cake into the batter before putting it in the oven. Pound cake is supposed to rise a bit in the oven, so you might not be able to completely cover the pink heart cake with the batter for the second cake. Mine started out covered, but the batter melted down and evened out before starting to rise. In the end, some of the heart cake was poking out the top, but I almost preferred the look of that part of the cake, once sliced. I was very happy with the way it turned out, and it was a huge hit at the Valentine's Day Tea that I attended!

This is a cute way to celebrate Valentine's Day. A classic pound cake with a heart baked in the middle, served with strawberries and whipped cream is sure to be a hit!
Valentine's Pound Cake
 Source: Baking Illustrated
Yield: Serves 12
Preparation time: 20 minutes
Cook time: 70-80 minutes
Total time: 1 hour, 30 minutes
Ingredients
- 16 tablespoons unsalted butter (2 sticks), softened but still cool
- 1 1/3 cups sugar (9 1/3 ounces)
- 3 large eggs, at room temperature
- 3 large egg yolks, at room temperature
- 1 1/2 teaspoons vanilla extract
- 1 1/2 teaspoons water
- 1/2 teaspoon salt
- 1 1/2 cups plain cake flour (6 ounces) (note: Bridget recommends adding 1/2 teaspoon baking powder. I definitely would have done so if I'd see her post before making this.)
Instructions
- Adjust an oven rack to the middle position and heat the oven to 325 degrees F. Grease a 9 by 5-inch loaf pan ( 7.5 cup capacity). Fit a sheet of foil or parchment paper lengthwise in the bottom of the greased pan, pushing it into the corners and up the sides. Fit a second sheet crosswise in the pan in the same manner.
- Beat the butter in the bowl of a standing mixer at medium-high speed until smooth and shiny, about 15 seconds. With the machine still on, sprinkle the sugar in slowly, taking about 30 seconds. Beat the mixture until light, fluffy, and almost white, 4 to 5 minutes, stopping the mixer once or twice to scrape down the sides of the bowl with a rubber spatula.
- Stir together the eggs, yolks, vanilla, and water in a 2-cup liquid measuring cup. With the mixer running at medium-high speed, add the egg mixture to the buter and sugar in a very slow, thin stream. Finally, beat in the salt.
- Place 1/2 cup flour in a sieve and sift it over the batter. Fold gently with a rubber spatula, scraping up from the bottom of the bowl, until the flour is incorporated. Repeat twice more, adding flour in 1/2-cup increments.
- Scrape the batter into the prepared pan, smoothing the top with a spatula or wooden spoon. Bake until a toothpick or thin skewer inserted into the crack running a long the top comes out clean, 70 to 80 minutes. (I found it did not take this long in my oven. 60 minutes was enough for mine, so check early!) Let the cake rest in the pan for 5 minutes, then invert onto a wire rack. Place a second wire rack on the cake bottom, then turn the cake top-side up. Cool to room temperature, remove and discard the foil, and serve. If not served immediately, wrap the cake in plastic, then in foil. Store the cake at room temperature.
Friday, February 3, 2012
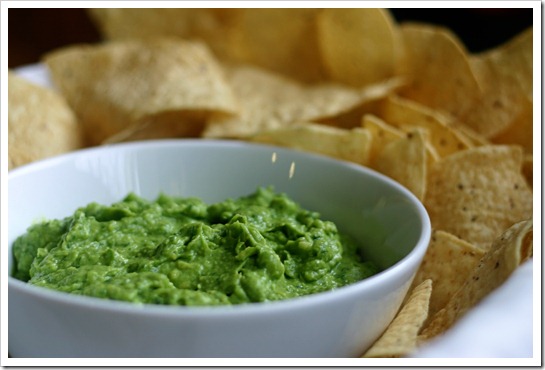
Guacamole

Along with pico de gallo and fresh tomatillo salsa (which I hope to share someday!), this is another favorite recipe to come from my husband's family. It's so easy to throw together, and with avocados on sale for $1 each the past few weeks, we've been enjoying it every weekend. There are several schools of thought when it comes to what belongs in guacamole, but I definitely love the simplistic approach of this recipe from my husband's aunt, Ethel.
Creamy avocados in harmony with lime and cilantro make this a perfect snack for your next party, or any day!
Source: Tia Ethel
Yield: About 2 cups
Preparation time: 10 minutes
Guacamole
Source: Tia Ethel
Yield: About 2 cups
Preparation time: 10 minutes
Ingredients
- 4 avocados
- 2 limes
- 3/4 cup fresh cilantro
- 1/4 teaspoon garlic powder (optional)
- pinch salt, to taste
Instructions
- Add the flesh from the avocados to a large bowl or food processor. Set aside one or two of the pits; we'll add them back at the end to keep the guacamole from browning.
- Add juice of 2 limes, cilantro, garlic powder (if using), and a pinch of salt to the bowl.
- Blend with an immersion blender or process in the food processor, until well blended and no large pieces of avocado are visible.
- Check for taste; add more salt and blend again if needed. I like to taste the guacamole using the chips that it will be served with, since those are often salty on their own.
- Add reserved avocado pits and push them into the guacamole. Serve immediately, or cover tightly with plastic wrap pressed against the guacamole and chill in the refrigerator until serving. (I prefer it slightly chilled, so I like to do this.)
Tuesday, January 31, 2012
Baked Buffalo Wings
When I was first getting to know my (now) husband, I was relieved to discover there would never be a sports team rivalry in our house. The only sport he (mildly) cares for is football, and his favorite team is ::snicker:: the 49ers. I'm not a huge sports fan myself, but I'll watch baseball if the Red Sox are playing, football if the Patriots are playing, hockey if the Bruins are playing, and basketball if the Celtics are playing (maybe).
I never dreamed we'd have such an interesting day in our house, as the day of the AFC/NFC championship games. I eagerly watched as much as I could of both games (working around our son's naps and bedtime). First - the Pats win. And down to the last few minutes, the 49ers could have pulled off a victory, too. I was a little sad at the loss, because that would have made for a really exciting Superbowl in our house!

I wanted to make buffalo wings for this day of football. I've used Alton's method/recipe before, but when I finally got around to trying that sauce, I was underwhelmed. So this time I went off in search of a new recipe, and this one caught my eye. I decided to give this new method a try, as well, as it looked a little easier and I liked the idea of baking the wings for a few minutes with the sauce on them.
We loved this spicy and slightly sweet sauce for buffalo wings. These baked wings aren't as crisp as fried ones, but I actually prefer them! To turn up the heat, increase the cayenne in the coating, or spike the sauce with some Tabasco or other favorite hot sauce.
Source: Slightly adapted from Lana's Cooking
Yield: Serves 2-3
Preparation time: 20 minutes
Inactive time: 1 hour
Cook time: 1 hour
Total time: 2 hours, 20 minutes
I never dreamed we'd have such an interesting day in our house, as the day of the AFC/NFC championship games. I eagerly watched as much as I could of both games (working around our son's naps and bedtime). First - the Pats win. And down to the last few minutes, the 49ers could have pulled off a victory, too. I was a little sad at the loss, because that would have made for a really exciting Superbowl in our house!

I wanted to make buffalo wings for this day of football. I've used Alton's method/recipe before, but when I finally got around to trying that sauce, I was underwhelmed. So this time I went off in search of a new recipe, and this one caught my eye. I decided to give this new method a try, as well, as it looked a little easier and I liked the idea of baking the wings for a few minutes with the sauce on them.
We loved this spicy and slightly sweet sauce for buffalo wings. These baked wings aren't as crisp as fried ones, but I actually prefer them! To turn up the heat, increase the cayenne in the coating, or spike the sauce with some Tabasco or other favorite hot sauce.
Baked Buffalo Wings
Source: Slightly adapted from Lana's Cooking
Yield: Serves 2-3
Preparation time: 20 minutes
Inactive time: 1 hour
Cook time: 1 hour
Total time: 2 hours, 20 minutes
Ingredients
- 3/4 cup flour
- 1/2 teaspoon cayenne powder, or more to taste
- 1/2 teaspoon garlic powder
- 1 teaspoon salt, divided
- 20 chicken drummettes
- 1/4 cup butter, melted
- 3/4 cup Frank's, or your favorite hot sauce
- 2 tablespoons honey
- 2 tablespoons soy sauce
Instructions
- Prepare a large baking sheet by lining with foil. Spray a cooling rack generously with cooking spray and place in the baking sheet.
- Add flour, cayenne powder, garlic powder, and 1/2 teaspoon of salt to a large ziploc bag. Seal the bag and shake to mix ingredients together.
- Dry the drummettes well with paper towels, then toss in the ziploc bag until well coated, about 5 at a time. Shake off the excess flour and place on prepared rack.
- Place the wings in the refrigerator, uncovered, for at least one hour.
- Preheat the oven to 400 degrees.
- Bake wings for 25 minutes, turn each wing over, then bake an additional 25 minutes.
- Meanwhile, whisk together the melted butter, hot sauce, honey, soy sauce and remaining ½ teaspoon of salt in a small bowl.
- Remove the wings from the oven and dip them 3 or 4 at a time in the sauce mixture.
- Place the coated wings back on the pan, return the pan to the oven and cook for an additional 6-7 minutes.
- Remove from the oven, place on a serving dish and drizzle remaining sauce over wings.
Friday, November 4, 2011
Carrot Cake Comparison
Today, I am honored to be recognized by a fellow food blogger, Jen of The Beantown Baker. She's included me in her (fabulous) Friday Favs series! Hop on over to her blog to see the results of my carrot cake comparison!


Thursday, August 25, 2011
Chipotle Salsa Turkey Burgers
Whew! It's time to dust off the cobwebs around here. We've had a busy summer and I took some time to focus on my family, friends, and home. I'm excited to get back to blogging again, especially with fall just around the corner and a new season of Glee and Glee Cupcakes!
Part of the reason for the slow down around here is that I wasn't really making new recipes. To keep things simple in the kitchen, I fell back on things I've made before and knew we loved. This recipe is one that I made many times over this summer. The inspiration came one day when there were a few odd ingredients in the fridge that needed to be used up. This is one of those recipes that, now, I can skip the recipe card and go based on memory - and I love that!

These turkey burgers are a great choice when you are looking for something different than your run-of-the-mill burgers. The chipotle and adobo sauce provide a great smokiness, and the red onion is bright punch of flavor. We love them!
Yield: Serves 4
Preparation time: 10 minutes
Cook time: 15 minutes
Total time: 25 minutes
Part of the reason for the slow down around here is that I wasn't really making new recipes. To keep things simple in the kitchen, I fell back on things I've made before and knew we loved. This recipe is one that I made many times over this summer. The inspiration came one day when there were a few odd ingredients in the fridge that needed to be used up. This is one of those recipes that, now, I can skip the recipe card and go based on memory - and I love that!

These turkey burgers are a great choice when you are looking for something different than your run-of-the-mill burgers. The chipotle and adobo sauce provide a great smokiness, and the red onion is bright punch of flavor. We love them!
Chipotle Salsa Turkey Burgers
Yield: Serves 4
Preparation time: 10 minutes
Cook time: 15 minutes
Total time: 25 minutes
Ingredients
- 1 pound ground turkey
- 1 chipotle pepper with about 1 tablespoon adobo sauce
- 1/3 cup salsa
- 1/2 cup whole wheat breadcrumbs
- 1/3 cup red onion, diced
- 1/3 cup chopped fresh cilantro
- juice from one large lime, divided
- 2 teaspoons chili or taco seasoning
- 1/2 an avocado
- burger buns, lettuce, sliced tomato, cheese, and whatever else you like to put on burgers
Instructions
- De-seed and mince the chipotle pepper.
- Add all ingredients except avocado and half of the lime juice to a large bowl.
- Mix gently just until thoroughly combined; do not over-work.
- Shape into four equal burgers. Grill over medium-high heat for 5-7 minutes per side, or until no longer pink in the center.
- Mix avocado and reserved half of the lime juice in a small bowl. Spread avocado mixture on burger bun. Build the burger with your favorite toppings, and enjoy!
Friday, June 24, 2011
Good Morning Muffins
Long ago, I learned an important kitchen lesson: read the recipe in its entirety before you even think about making it. Too many times before that, I'd only have skimmed the ingredient list, then go to make the recipe and realize I need an overnight rest/marinade, or the final product needs 4 hours to set afterwards, or some other hidden time requirement. I'm much better, now, at properly preparing myself for a recipe. Still, I sometimes get ahead of myself.
Last Saturday I was happily pouring over a new baking book, when I saw this muffin recipe. I thought to myself, "perfect! I'll prep the ingredients tonight and bake in the morning." I often do that, these days, since dragging out containers of dry ingredients and measuring them is a lot easier when our son is asleep, than when he is awake. Later that evening, when I set out to combine dry ingredients and locate all the others and arrange them in an easy-to-grab place in the fridge, I realize there was very little prep work that could be done. Sure, I could throw together the few dry ingredients, but those comprised not even a third of the ingredient list - not a huge time saver. I didn't want to grate the zucchini or chop the apple ahead of time, so I conceded and left all the prep work for Sunday morning.

As I made the muffins on Sunday morning, I wondered if all this work (in itself not much, but more than any other muffin recipe I've made) would be worth it. I got my answer shortly after removing these glorious muffins from the oven. Absolutely - yes! I was so excited to try one, I didn't even wait for them to properly cool. These quickly became my new favorite muffin, and I can't wait to make them again. The add-ins play so well together, against the almost nutty whole wheat muffin base, with just the right hint of cinnamon to round it out.

These lightly sweetened muffins are packed with delicious add-ins and make a fabulous breakfast!
Source: Slightly adapted from Flour, by Joanne Chang
Last Saturday I was happily pouring over a new baking book, when I saw this muffin recipe. I thought to myself, "perfect! I'll prep the ingredients tonight and bake in the morning." I often do that, these days, since dragging out containers of dry ingredients and measuring them is a lot easier when our son is asleep, than when he is awake. Later that evening, when I set out to combine dry ingredients and locate all the others and arrange them in an easy-to-grab place in the fridge, I realize there was very little prep work that could be done. Sure, I could throw together the few dry ingredients, but those comprised not even a third of the ingredient list - not a huge time saver. I didn't want to grate the zucchini or chop the apple ahead of time, so I conceded and left all the prep work for Sunday morning.

As I made the muffins on Sunday morning, I wondered if all this work (in itself not much, but more than any other muffin recipe I've made) would be worth it. I got my answer shortly after removing these glorious muffins from the oven. Absolutely - yes! I was so excited to try one, I didn't even wait for them to properly cool. These quickly became my new favorite muffin, and I can't wait to make them again. The add-ins play so well together, against the almost nutty whole wheat muffin base, with just the right hint of cinnamon to round it out.

These lightly sweetened muffins are packed with delicious add-ins and make a fabulous breakfast!
Good Morning Muffins
Source: Slightly adapted from Flour, by Joanne ChangYield: 12 muffins
Preparation time: 20 min
Cook time: 45 min
Total time: 1 hour, 5 minutes
Ingredients
- 1/2 cup (40 grams) wheat or oat bran
- 1/2 cup (120 grams) hot water
- 1 small zucchini, grated (about 1 1/2 cups packed or 200 grams)
- 1/2 cup (80 grams) raisins
- 1/2 cup (50 grams) pecan halves, chopped and toasted
- 1/2 cup (60 grams) unsweetened flaked coconut
- 1 apple, peeled, cored and chopped (about 1 cup or 120 grams)
- 2/3 cup (150 grams) packed light brown sugar
- 3 eggs (or 3 Tablespoons ground flax seed with 9 tablespoons water)
- 3/4 cup (150 grams) canola or safflower oil
- 1 teaspoon vanilla extract
- 1 1/2 cups (210 grams) whole wheat pastry flour
- 3/4 cup (75 grams) old fashioned rolled oats (not instant)
- 2 teaspoons baking powder
- 1/2 teaspoon kosher salt
- 1/2 teaspoon ground cinnamon
Instructions
- Position a rack in the center of the oven and preheat to 350 degrees F. Prepare a muffin tin with nonstick baking spray or paper liners.
- In a medium bowl, stir together the bran and hot water until the bran in completely moistened. Add zucchini, raisins, pecans, coconut, apple; stir until well mixed.
- If you are using eggs: Using a stand mixer with a whisk attachment, beat sugar and eggs on medium speed for 3-4 minutes, until the mixture thickens and lightens. (This will take 6-8 minutes with a hand-held mixer). On low speed, drizzle in oil, slowly, and vanilla. Adding it slowly is key to maintain the air you have beaten into the eggs. If you are using flax seed/water as an egg substitute: add sugar, flax seed, water, oil and vanilla to a large bowl and whisk until thoroughly combined.
- In a medium bowl, stir together oats, flour, baking powder, salt, and cinnamon. Add the flour mixture to the egg mixture, folding carefully with a spatula until well combined. Add the bran mixture and fold until well combined. Spoon batter into prepared muffin cups, dividing it evenly and filling the cups to the rim.
- Bake 35 to 45 minutes, or until muffins are lightly brown on top and spring back when pressed in the middle with a fingertip. Let cool on a wire rack for 20 minutes, then remove muffins from pan to finish cooling.
- The muffins taste best the day they are made, but can be stored in an airtight container at room tempurature for up to 3 days. They can be frozen up to a week, if wrapped tightly in plastic wrap.
Tuesday, May 24, 2011
Glee! Star-Berry Cupcakes

For tonight's season finale (*tear*), I chose to present Rachel's cupcake. I am always sad when the show goes on break or the season ends, but this time I am also excited, as I will have all summer to dream up awesome Gleecakes (thanks, Kelsey!) for the rest of the gang, including Finn, Quinn, Puck, Santana, Brittany, Artie, Sam, Sue, Mr. Schue... maybe even a (crazy)Gleecake for Terri?

Rachel is an exceedingly driven member of the student body at McKinley High. She wants nothing more in life than to be a star (well, aside from gaining the affections of Finn). She lets nothing stop in her way of getting as much exposure as possible - from always speaking her mind on any Glee club matter, to securing television commercials for the group, to demanding solos in competition.

Rachel is consistently reminding us that stars are her signature icon, so incorporating stars into her cupcake was a given! As Rachel would most surely attest that she is naturally uber talented, I chose a starfruit, with it's natural star shape, to adorn sparkly buttercream topped cupcakes. However, I also couldn't resist hiding a star inside the cupcake because, really, how much fun is this?!


Rachel's Star-Berry Cupcake combines vanilla cake with a surprise strawberry star baked inside, topped with strawberry swiss meringue buttercream, silver pearl dust, and sliced starfruit.


Source: Vanilla cake reworded from Confections of a Foodie Bride, Strawberry cake slightly adapted from Good Things Catered (inactive blog), Buttercream slightly adapted from The Culinary Life/Garrett McCord and Beantown Baker/epicurious,
Yield: about 12 cupcakes
Total time: 4 hours 10 minutes, including 2 hours inactive time

Star-Berry Cupcakes
Source: Vanilla cake reworded from Confections of a Foodie Bride, Strawberry cake slightly adapted from Good Things Catered (inactive blog), Buttercream slightly adapted from The Culinary Life/Garrett McCord and Beantown Baker/epicurious,
Yield: about 12 cupcakes
Total time: 4 hours 10 minutes, including 2 hours inactive time
Ingredients
For the strawberry cake:
- 1 1/4 cups cake flour
- 1/2 teaspoon baking soda
- 1/8 teaspoon salt
- 1/4 cup unsalted butter, at room temperature
- 3/4 cup sugar
- 1 large egg
- 2 1/2 tablespoons buttermilk, at room temperature
- 2 tablespoons oil
- 1/2 teaspoon pure vanilla extract
- 1 cup chopped strawberries
- 1/4 cup freeze dried raspberries, ground fine (optional, for coloring; can use red food coloring instead, if desired)
For the vanilla cake:
- 1 1/2 cups cake flour
- 1 1/2 teaspoons baking powder
- 1/4 teaspoon salt
- 1/2 cup unsalted butter, cubed and softened to room temperature
- 1 cup sugar
- 2 1/2 large eggs (beat the third egg in a small bowl, use half)
- 1/2 cup, plus 2 tablespoons buttermilk, at room temperature
- 2 teaspoons pure vanilla extract
For the buttercream and decoration:
- 4 ounces egg whites (from a carton is fine)
- 6 ounces sugar
- 10 tablespoons unsalted butter, at room
temperature - 1/2 teaspoon pure vanilla extract
- 2-4tablespoonspureed strawberries
- 1 starfruit, sliced thin
- silver pearl dust
Instructions
For the strawberry cake:
- Preheat oven to 350 degrees and prepare one 9" or 8" round cake pan by spraying with baking spray. Sift flour, salt, and baking soda in medium bowl. In bowl of mixer, cream butter and sugar until fluffy. Add eggs and mix until combined. Add buttermilk, oil and vanilla until combined. Add flour mixture and stir until just combined. Stir in chopped strawberries and ground freeze dried raspberries (or food coloring, to desired shade of pink/red).
- Pour batter into cake pan. Bake for approximately 25-30 minutes, or until a toothpick inserted into the center comes out clean. Cool cake in pan on wire rack for 10 minutes. Remove cake from pan and continue to cook on wire rack until thoroughly cooled.
- Wrap well in plastic wrap, and freeze for at least 2 hours to prepare cake for cutting. Once frozen, use a small star cookie or fondant cutter to make star shaped pieces of cake. Use immediately or store, well wrapped, in freezer until you are ready to continue with the cupcakes.
For the cupcakes:
- Preheat oven to 350. Line one muffin/cupcake baking pan with 12 cupcake liners. Set aside.
- In a medium bowl, sift together the flour, baking powder, and salt. Place butter in the bowl of a stand mixer, fitted with a paddle attachment. Beat for 3 minutes on medium-high speed until the butter is light and creamy in color. Stop and scrape the bowl. Cream the butter for an additional 60 seconds.
- Add the sugar, 1/4 cup at a time, beating 1 minute after each addition. Scrape the sides of the bowl before each addition. Add the eggs one at a time. Reduce the mixer speed. Stir vanilla into the buttermilk. Add the dry ingredients alternately with the buttermilk. Mix just until incorporated. Scrape the sides of the bowl and mix for 15 seconds longer.
- Add roughly 2 tablespoonds of batter to each cupcake liner. Place one frozen strawberry cake star in the batter, standing up and all facing the same way. (Remember which way stars are placed, so that decoration added to the top of the cupcakes at the end can signal which way to cut/eat the cake to reveal the star.) Continue to add vanilla batter to each cupcake liner, making sure to cover the stars.
- Center the pan onto the lower third of the oven and let bake 15-18 minutes. (A skewer test won't work here, since it would go into the pre-baked star cake.)
- Let cool completely in the pans. While baking and cooling, prepare buttercream. Frost cupcakes with buttercream, sprinkle with pearl dust, and top with sliced starfruit.

For the buttercream:
- Add egg whites and sugar to a heat-safe bowl. Place bowl over a pot of simmering water and whisk lightly until the muixture reaches 140 degrees F and the sugar is dissolved.
- Pour hot whites into a room-temperature bowl and whip with a wire whip until double in volume on medium-high speed. When the mixer stops, the meringue should not move around in the bowl. Meanwhile cut up butter into 2-inch pieces. (The butter should be slightly moist on the outside but cold inside.)
- On your mixer, remove the whip and attach the paddle. Add half the butter into the bowl immediately and pulsate the mixer several times until the meringue has covered the butter completely. To pulsate the mixer, turn it on and off in a jerky motion. This forces the butter on the top to the bottom of the bowl. Add the balance of the butter and pulsate mixer several times. Slowly increase the mixer's speed, starting with the lowest speed and increase the speed every 10 seconds until you reach a medium-high speed.
- Continue beating until the mixture begins to look light and fluffy. Stop the mixer and scrape the bowl. Reduce speed to low. Add vanilla and 2 tablespoonds of strawberry puree and continue to beat on low speed for 45 seconds. Then beat on medium-high speed for an additional 45 to 60 seconds. Add additional puree, if necessary, to acheive desired color and taste. If frosting gets too soft, powdered sugar can be added to help stiffen it back up.
Note: Leftover buttercream can be placed in plastic containers with lids and kept in the freezer for up to 3 months. Defrost completely (several hours) and rewhip before using. Storage: Store the icing in an airtight container and freeze for up to 3 months.
Tuesday, May 17, 2011
Glee! Gingered Bow Cupcakes

Emma is one of my favorite characters on Glee, so I was very excited to make her cupcake this weekend. On the outside, Emma is a reserved, polished, sweetheart of a guidance counselor with a little spunk to go along with her firery red hair. Inside, she wrestles with more complex issues - a battle with OCD and a longing to be loved by the one man who stole her heart.

I knew from the start that her cake would be carrot cake, but with her recent proclamation of Gingerhood, a little kick from some ground ginger was definitely in order! The ginger also helps add a level of complexity to the flavor of the cake, to play off Emma's internal struggles. In keeping with Emma's polished exterior, I topped the cake with a tribute to her signature bow blouses and throwback hairstyle - a white fondant bow with curled tails.

Emma's cupcake combines gingered carrot cake with a delicate cream cheese frosting, topped with a signature bow!

Gingered Bow Cupcakes
Source: Slightly adapted from Baking Illustrated
Yield: about 24 cupcakes
Total time: 45 minutes
Ingredients
- 2 1/2 cups whole wheat pastry flour (12 1/2 ounces)
- 1 1/4 teaspoons baking powder
- 1 teaspoon baking soda
- 1 1/4 teaspoons ground cinnamon
- 1/2 teaspoon ground nutmeg
- 1/8 teaspoon ground cloves
- 2 teaspoons ground ginger
- 1/2 teaspoons table salt
- 1 pound medium carrots (6 to 7), peeled
- 1 1/2 cups evaporated cane juice (10 1/2 ounces)
- 1/2 cup packed light brown sugar (3 1/2 ounces)
- 4 eggs (large)
- 1 1/2 cups safflower oil
- 8 ounces cream cheese, softened but still cool
- 5 tablespoons unsalted butter, softened but still cool
- 1 tablespoon orange juice
- 1/2 teaspoon vanilla extract
- 1 1/4 cups powdered sugar (4 1/2 ounces)
- fondant, for decorations
Instructions
- Wash all bowls, pans, utensils, and equipment in hot, soapy water. Dry thoroughly.
- Wash all carrots thoroughly to ensure they are free of pesticides.
- Day dream about Will Schuester.
- Adjust oven rack to middle position; heat oven to 350 degrees. Line 2 muffin pans with sterilized cupcake wrappers.
- Whisk together flour, baking powder, baking soda, cinnamon, nutmeg, cloves, ginger, and salt in medium bowl; set aside.
- In food processor fitted with large shredding disk, shred carrots (you should have about 3 cups); transfer carrots to bowl and set aside. Wash food processor components thoroughly with hot, soapy water, then dry pieces and fit bowl with metal blade. Process granulated and brown sugars and eggs until frothy and thoroughly combined, about 20 seconds. With machine running, add oil through feed tube in steady stream. Process until mixture is light in color and well emulsified, about 20 seconds longer. Scrape mixture into large bowl.
- Realize you are alone and break down in tears, singing "All By Myself."
- Pull yourself together.
- Stir in carrots and dry ingredients until incorporated and no streaks of flour remain. Full cupcake wrappers 2/3 of the way and until toothpick or skewer inserted into center comes out clean, about 16-20 minutes, rotating pan halfway through baking time.
- Cool cupcakes to room temperature in pan on wire rack. When ready to frost, prepare icing. Try not to pass out while working with cream cheese and butter. Process cream cheese, butter, orange juice, and vanilla in clean food processor workbowl until combined, about 10 seconds, scraping down bowl with rubber spatula as needed. Add powdered sugar and process until smooth, about 10 seconds. Frost cupcakes and top with fondant bow. Have a cupcake to make yourself feel better.
- Resume day dreaming about Will Schuester.

Subscribe to:
Posts (Atom)

